Fall is the perfect season to experiment with new nail designs. With the rich, warm hues of autumn and festive themes of Halloween, the possibilities are endless. In this article, I’ll walk you through some of the best fall gel nail designs. Whether you’re looking for something cute, simple, or trendy, there’s something for everyone. Let’s dive into these Autumn nail ideas that will keep your manicure looking fresh all season long.
Autumn Harvest Delight
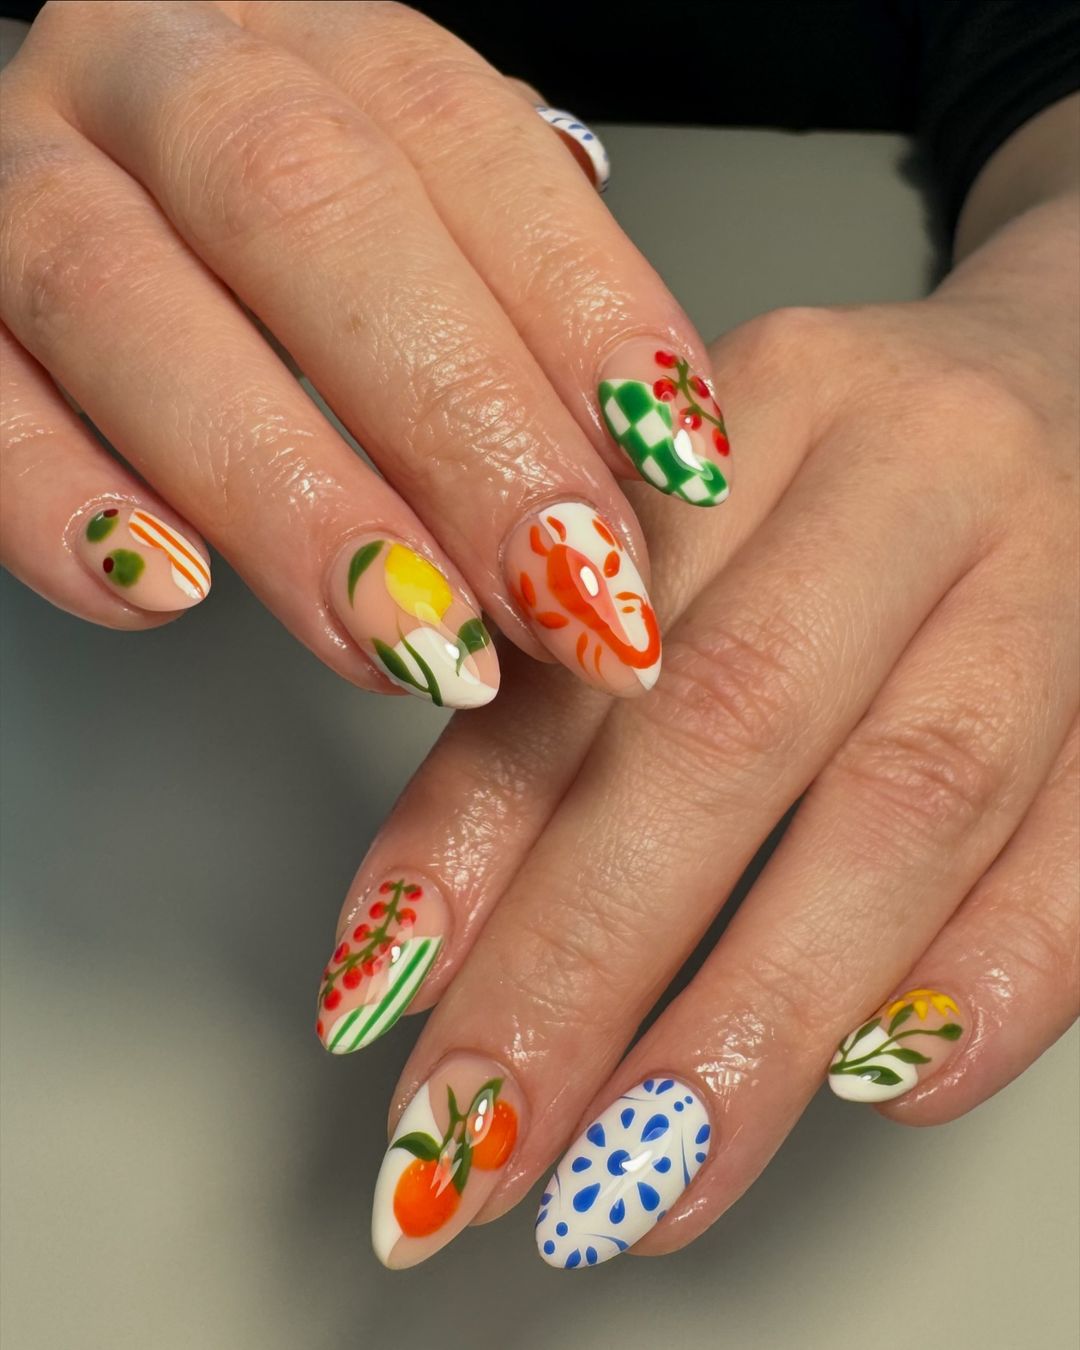
As a professional manicurist, I can confidently say that this Autumn Harvest Delight design is a standout. The combination of vibrant fruits and vegetables painted meticulously on each nail captures the essence of the season. The use of orange, green, and red hues ties in the natural Autumn color palette perfectly. This design is ideal for those who love detailed and artistic nail art.
-
- Base coat: OPI Natural Nail Base Coat
- Orange nail polish: Essie “Playing Koi”
- Green nail polish: Zoya “Hunter”
- Red nail polish: Sally Hansen “Cherry Red”
- Detail brush: Beetles Nail Art Brushes
- Top coat: Seche Vite Dry Fast Top Coat
Creation Instructions:
-
- Apply a base coat to protect your nails.
- Paint each nail with a neutral base color to make the designs pop.
- Use a fine detail brush to paint small fruits and vegetables on each nail, using orange, green, and red polishes.
- Allow the designs to dry completely before applying a top coat to seal and protect your artwork.
Halloween Night Magic
This Halloween Night Magic design is perfect for the spooky season. The vibrant mix of purple, orange, and black creates a mysterious and festive look. The swirling patterns add a touch of whimsy, making it a great choice for a Halloween party or just to celebrate the season.
-
- Base coat: CND Stickey Base Coat
- Purple nail polish: China Glaze “Grape Juice”
- Orange nail polish: OPI “A Good Man-darin Is Hard to Find”
- Black nail polish: Essie “Licorice”
- Nail art striping tape: Born Pretty Nail Art Striping Tape
- Top coat: Essie Gel Setter Top Coat
Creation Instructions:
-
- Start with a base coat to ensure your nails are protected.
- Apply the purple polish as the base color on all nails.
- Use the striping tape to create swirls and patterns, then fill in with orange and black polish.
- Carefully remove the striping tape and let the polish dry.
- Finish with a top coat to add shine and durability.
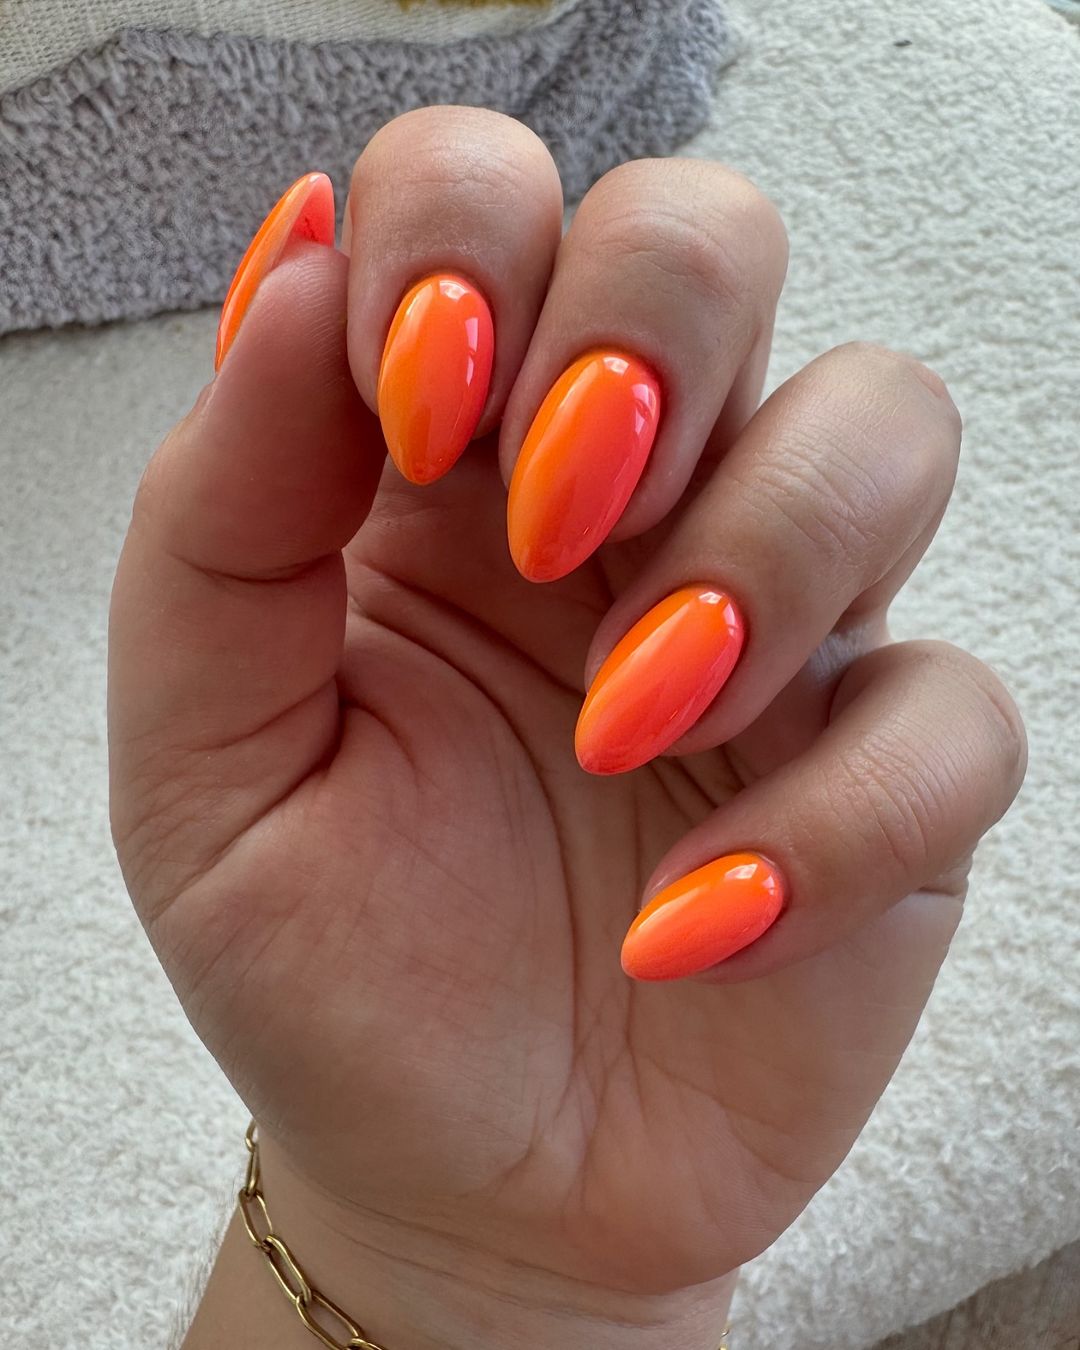
Citrus Sunrise
The Citrus Sunrise design is a vibrant and refreshing take on Autumn nails. The gradient effect from bright orange to yellow mimics a beautiful sunrise, while the simplicity of the design makes it suitable for everyday wear. This look is perfect for those who prefer short nails but still want a bold and eye-catching manicure.
-
- Base coat: OPI Infinite Shine Primer
- Yellow nail polish: Sally Hansen “Mellow Yellow”
- Orange nail polish: Essie “Tangerine Tease”
- Makeup sponge: Real Techniques Miracle Complexion Sponge
- Top coat: Glisten & Glow Top Coat
Creation Instructions:
-
- Apply a base coat to start.
- On a makeup sponge, apply yellow and orange polishes side by side.
- Dab the sponge onto your nails to create a gradient effect.
- Repeat the sponging process until the colors blend seamlessly.
- Allow your nails to dry, then apply a top coat to seal the design.
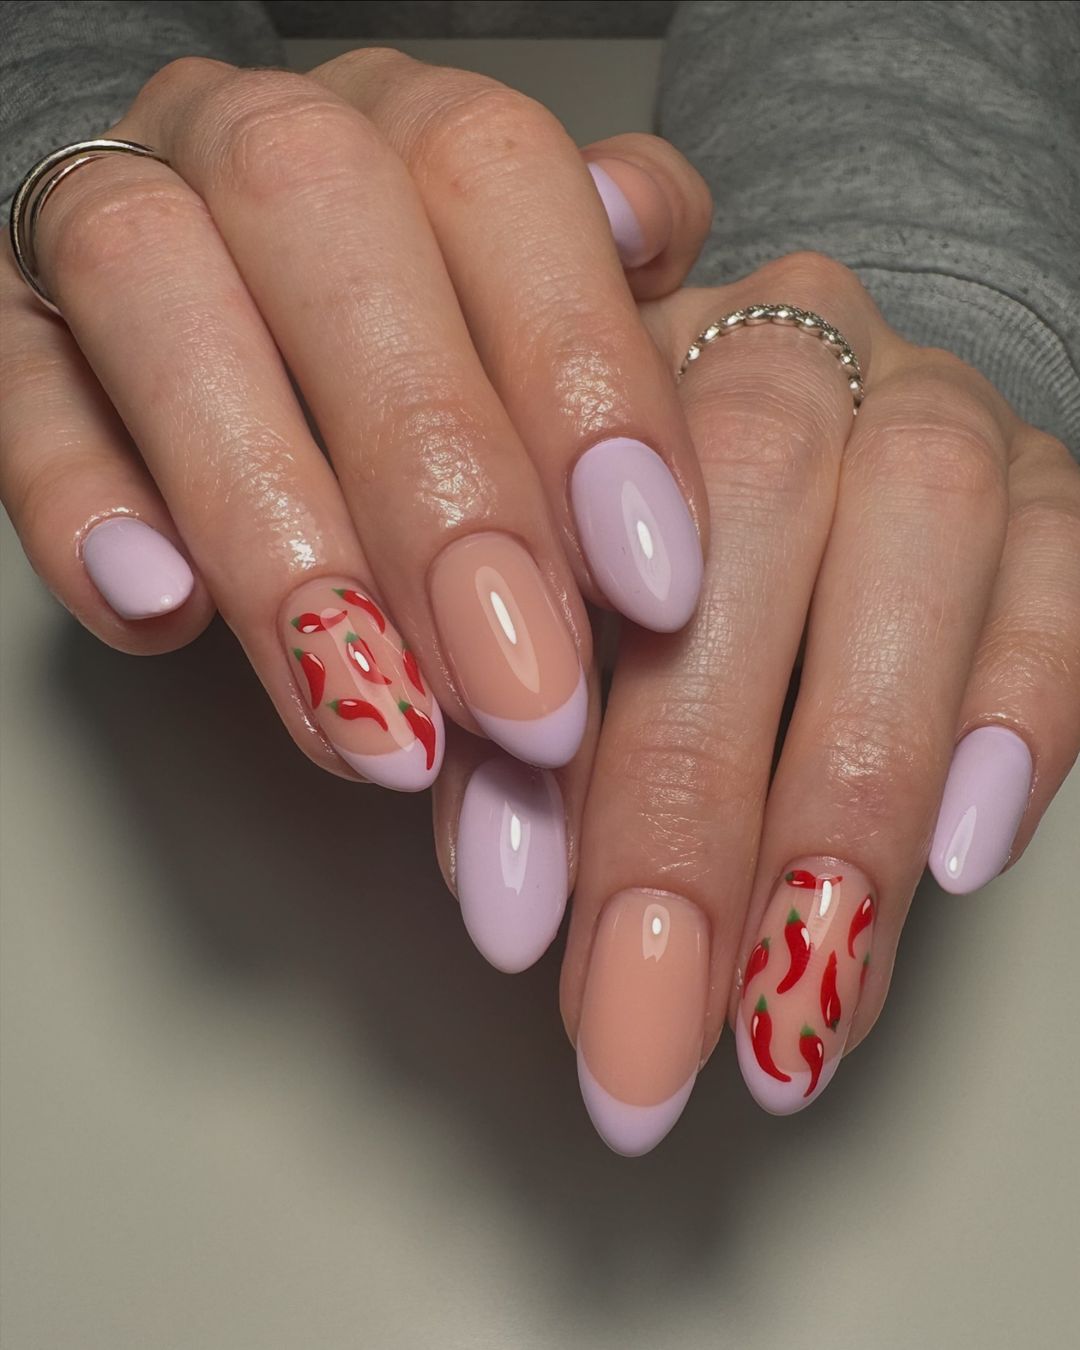
Lavender Dreams and Chili Peppers
Lavender dreams and chili peppers come together in this delightful nail design. The soft pastel purple combined with the vibrant red chili pepper accents creates a striking contrast that is both playful and chic. The almond shape of the nails further enhances the elegance of this design, making it perfect for any occasion.
-
- Base coat: OPI Nail Envy
- Lavender nail polish: Essie “Lilacism”
- Nude nail polish: Butter London “Mum’s the Word”
- Red nail polish: Sally Hansen “Rapid Red”
- Detail brush: Beetles Nail Art Brushes
- Top coat: Seche Vite Dry Fast Top Coat
Creation Instructions:
-
- Apply a base coat to protect your nails and ensure longevity.
- Paint the nails with the lavender polish, leaving a couple of nails for the nude base.
- On the nude base nails, use a detail brush to draw small chili peppers with the red polish.
- Allow the design to dry completely before applying a top coat to seal and add shine.
Save Pin
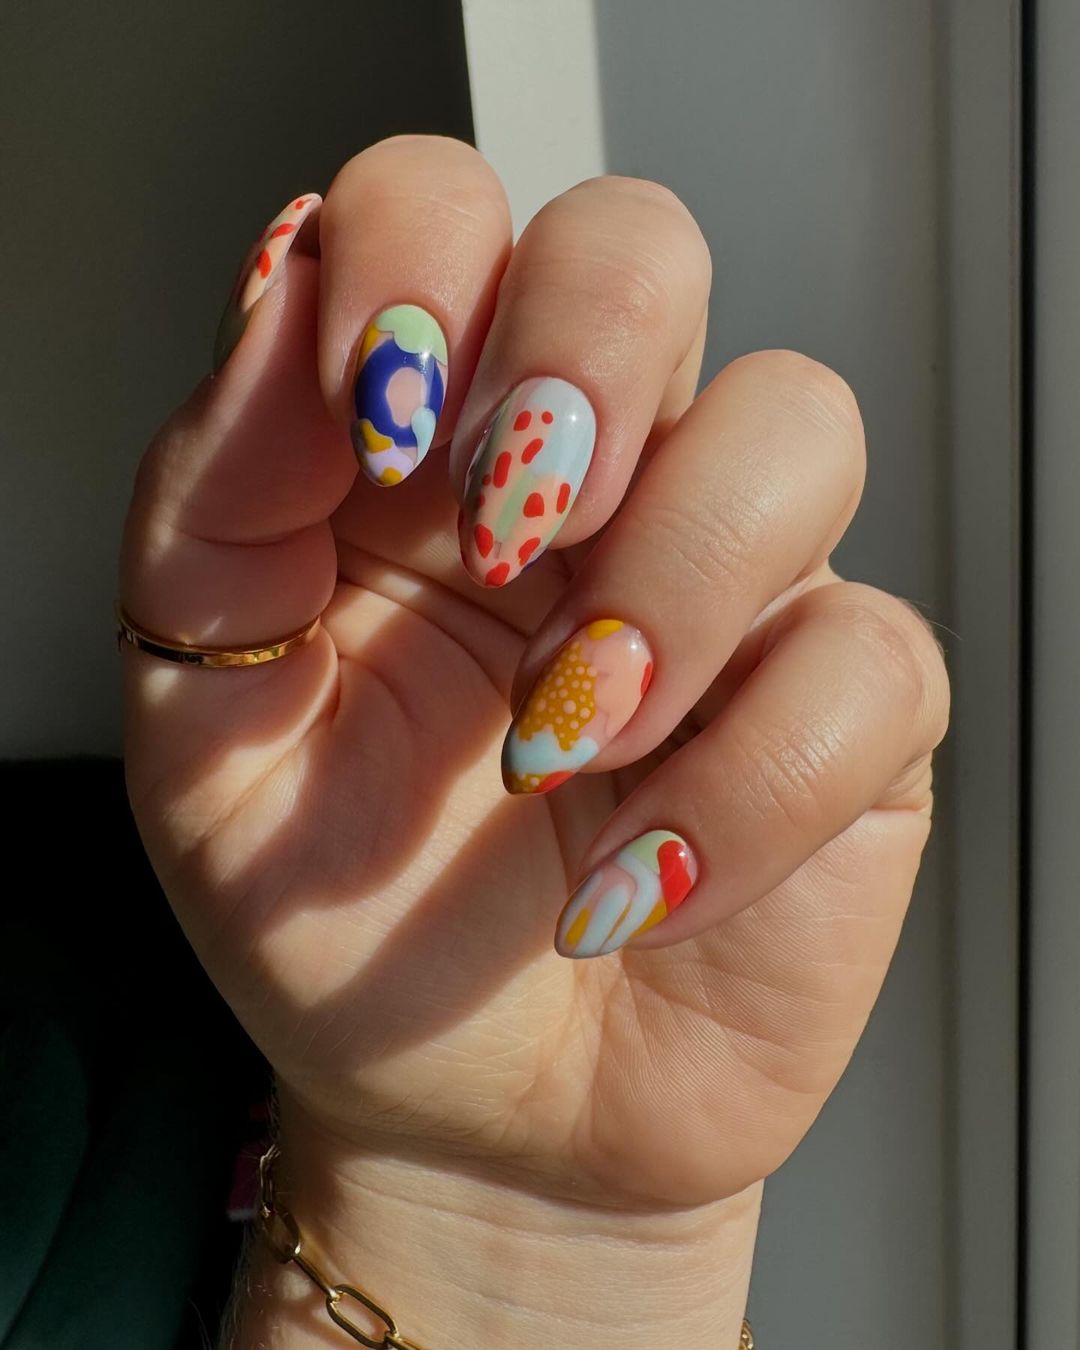
Artistic Autumn Abstract
This design is a celebration of autumn with its abstract art-inspired patterns. Using a blend of colors that include orange, yellow, green, and purple, this look is both sophisticated and trendy. The round shape of the nails provides a perfect canvas for these intricate designs, making it a standout choice for the season.
-
- Base coat: CND Stickey Base Coat
- Orange nail polish: Essie “Tangerine Tease”
- Yellow nail polish: OPI “Sun, Sea, and Sand in My Pants”
- Green nail polish: Zoya “Tilda”
- Purple nail polish: China Glaze “Grape Juice”
- Nail art brushes: Makartt Nail Art Brushes
- Top coat: Essie Gel Setter Top Coat
Creation Instructions:
-
- Start with a base coat to ensure your nails are protected.
- Paint each nail with a light base color.
- Using nail art brushes, create abstract shapes and patterns with the different colors.
- Allow the designs to dry completely before applying a top coat to seal the artwork.
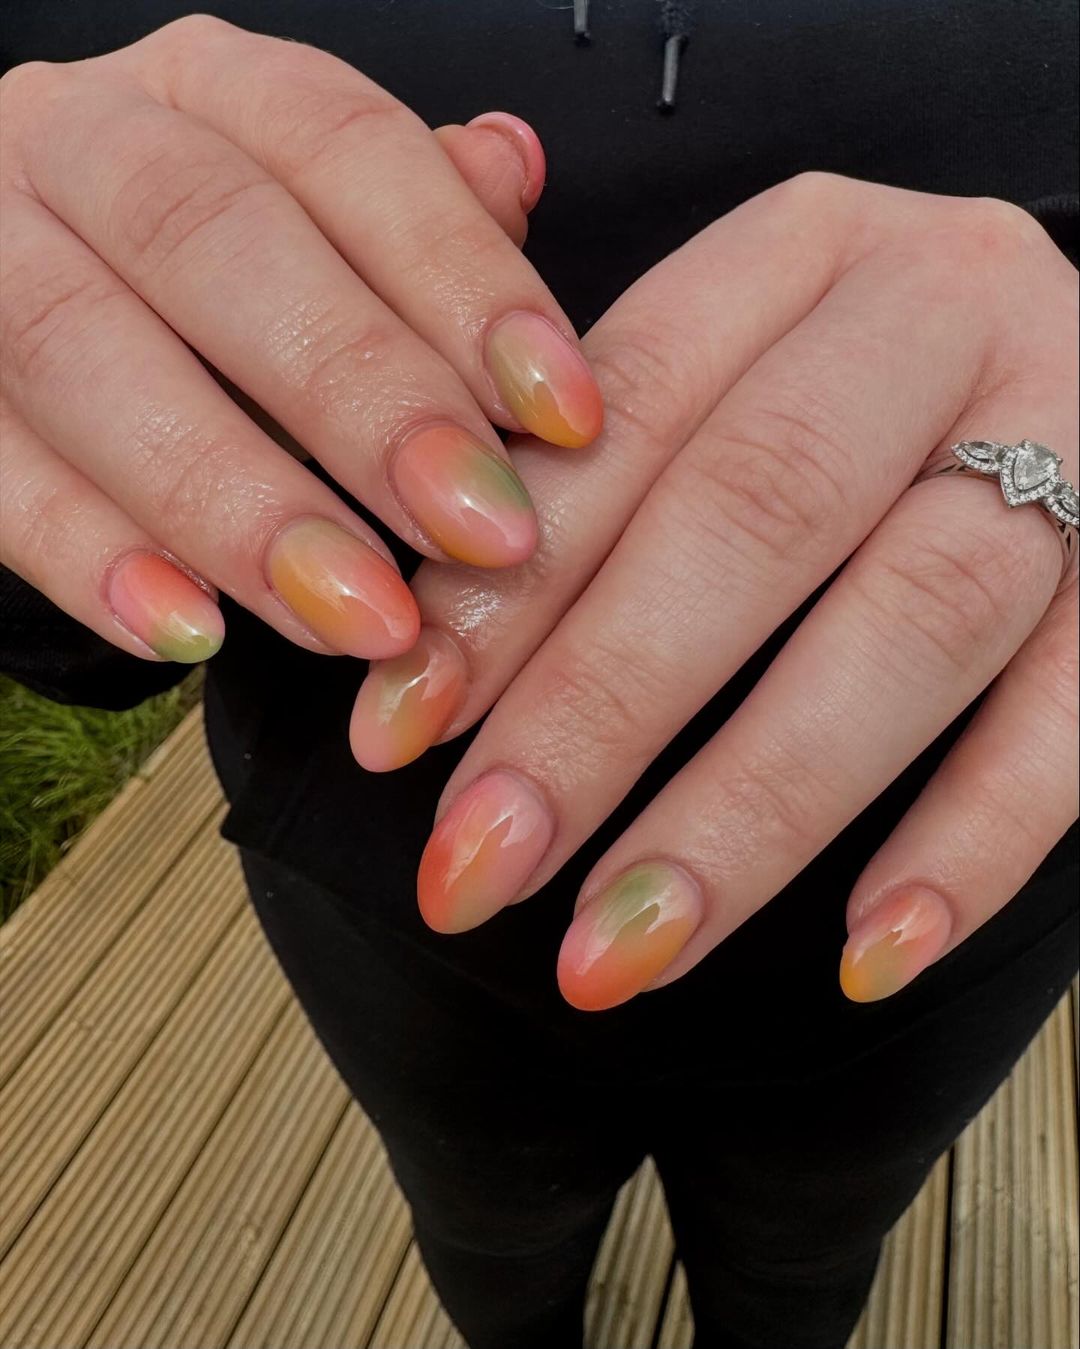
Sunset Gradient Elegance
The sunset gradient elegance design captures the beauty of a fall sunset with its soft blend of colors. The gradient effect transitions smoothly from warm oranges to cool greens, creating a serene and sophisticated look. The almond shape of the nails complements the gradient beautifully, making it an ideal choice for those who love elegant nail art.
-
- Base coat: OPI Natural Nail Base Coat
- Orange nail polish: Essie “Playing Koi”
- Green nail polish: Zoya “Hunter”
- Makeup sponge: Real Techniques Miracle Complexion Sponge
- Top coat: Seche Vite Dry Fast Top Coat
Creation Instructions:
-
- Apply a base coat to start.
- On a makeup sponge, apply orange and green polishes side by side.
- Dab the sponge onto your nails to create a gradient effect.
- Repeat the sponging process until the colors blend seamlessly.
- Allow your nails to dry, then apply a top coat to seal the design.
Mystical Mint Elegance
This stunning design combines nude and mint green hues with intricate detailing. The nail art features delicate hearts, stars, and crescent moons, enhanced by metallic accents. The stiletto shape adds a dramatic flair, perfect for making a statement this autumn.
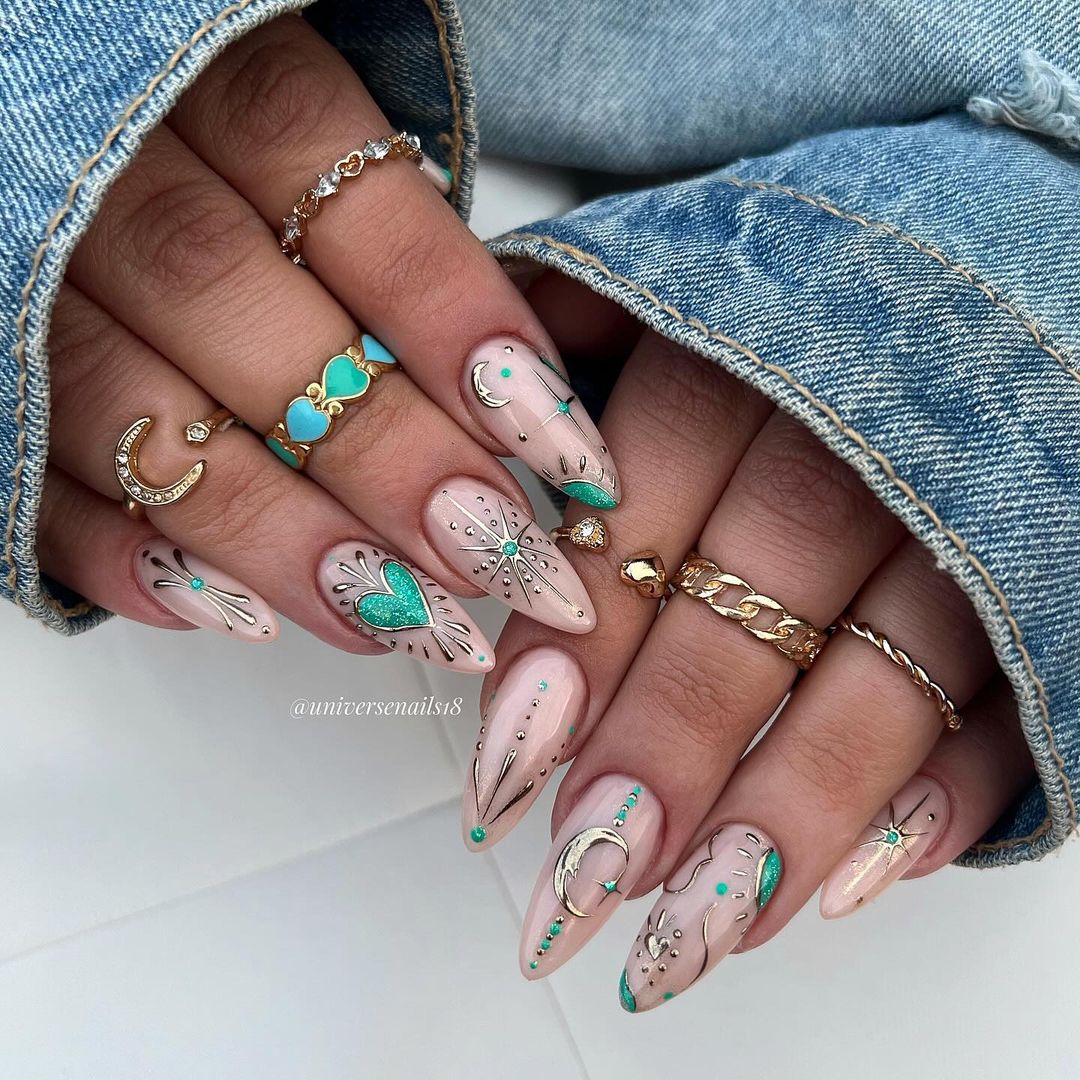
-
- Base coat: OPI Natural Nail Base Coat
- Nude nail polish: Essie “Topless & Barefoot”
- Mint green nail polish: China Glaze “For Audrey”
- Metallic silver nail polish: Sally Hansen “Silver Sweep”
- Nail art brushes: Beetles Nail Art Brushes
- Rhinestones: Kiss Salon Secrets Luxe Accents
- Top coat: Seche Vite Dry Fast Top Coat
Creation Instructions:
-
- Apply a base coat to protect your nails.
- Paint your nails with the nude polish as the base color.
- Use nail art brushes to draw hearts, stars, and crescent moons with the mint green and metallic silver polishes.
- Apply rhinestones to add extra sparkle.
- Finish with a top coat to seal the design and add shine.
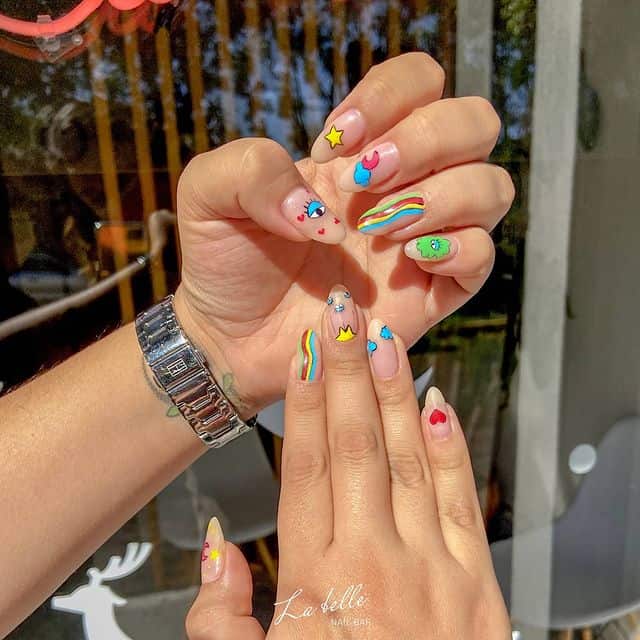
Neon Pop Art
Embrace your bold side with this vibrant and eclectic nail design. Featuring a mix of neon colors, lightning bolts, and graphic eyes, this design is perfect for those who love to stand out. The almond shape of the nails provides a modern canvas for this pop art-inspired look.
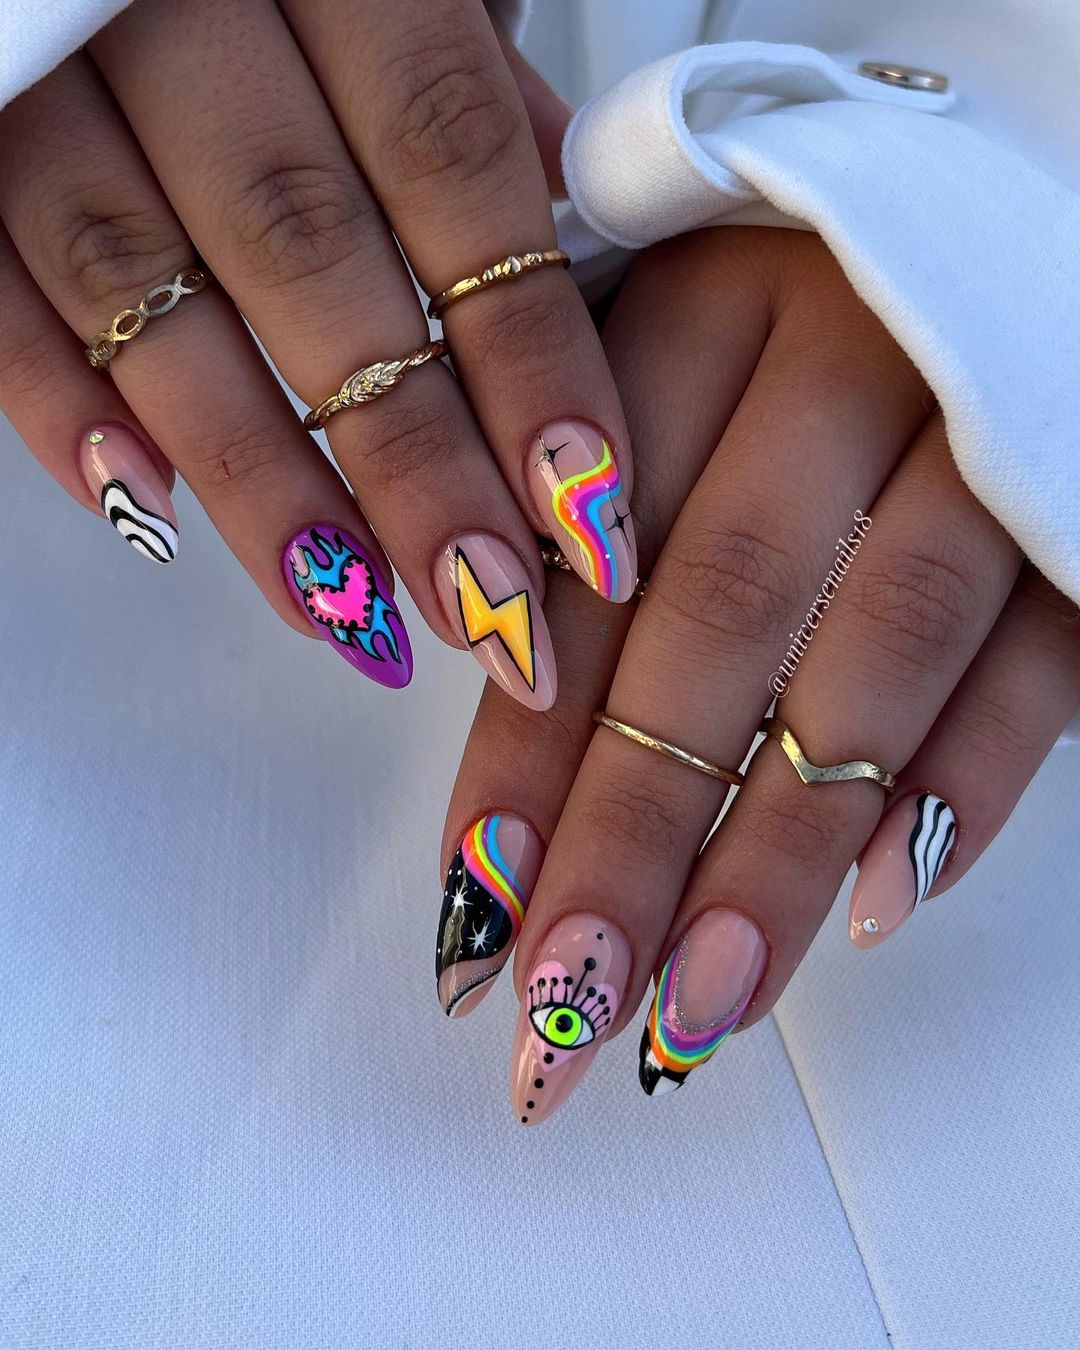
-
- Base coat: CND Stickey Base Coat
- Neon yellow nail polish: China Glaze “Yellow Polka Dot Bikini”
- Neon pink nail polish: Essie “Punchy Pink”
- Black nail polish: OPI “Black Onyx”
- White nail polish: Sally Hansen “White On”
- Detail brushes: Makartt Nail Art Brushes
- Top coat: Essie Gel Setter Top Coat
Creation Instructions:
-
- Start with a base coat to ensure your nails are protected.
- Apply the nude base color to all nails.
- Use detail brushes to create neon designs, such as lightning bolts, hearts, and eyes.
- Add black outlines for definition and white accents for contrast.
- Seal the design with a top coat for durability and shine.
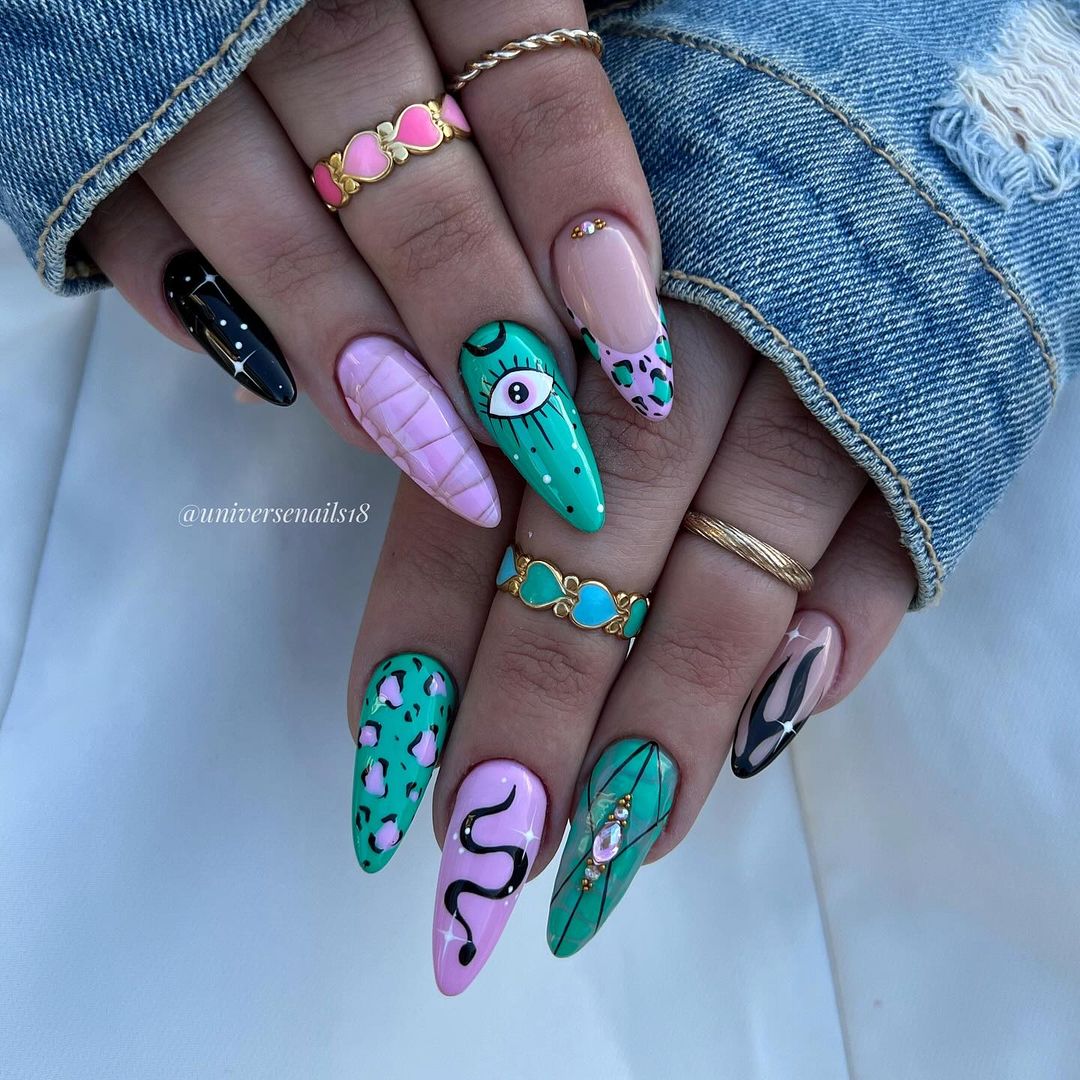
Cosmic Serpentine
This design combines mystical elements with a touch of edginess. Featuring a black serpent, heart with an eye, and celestial motifs, this design is both intriguing and stylish. The square shape of the nails adds a modern twist to the cosmic theme.
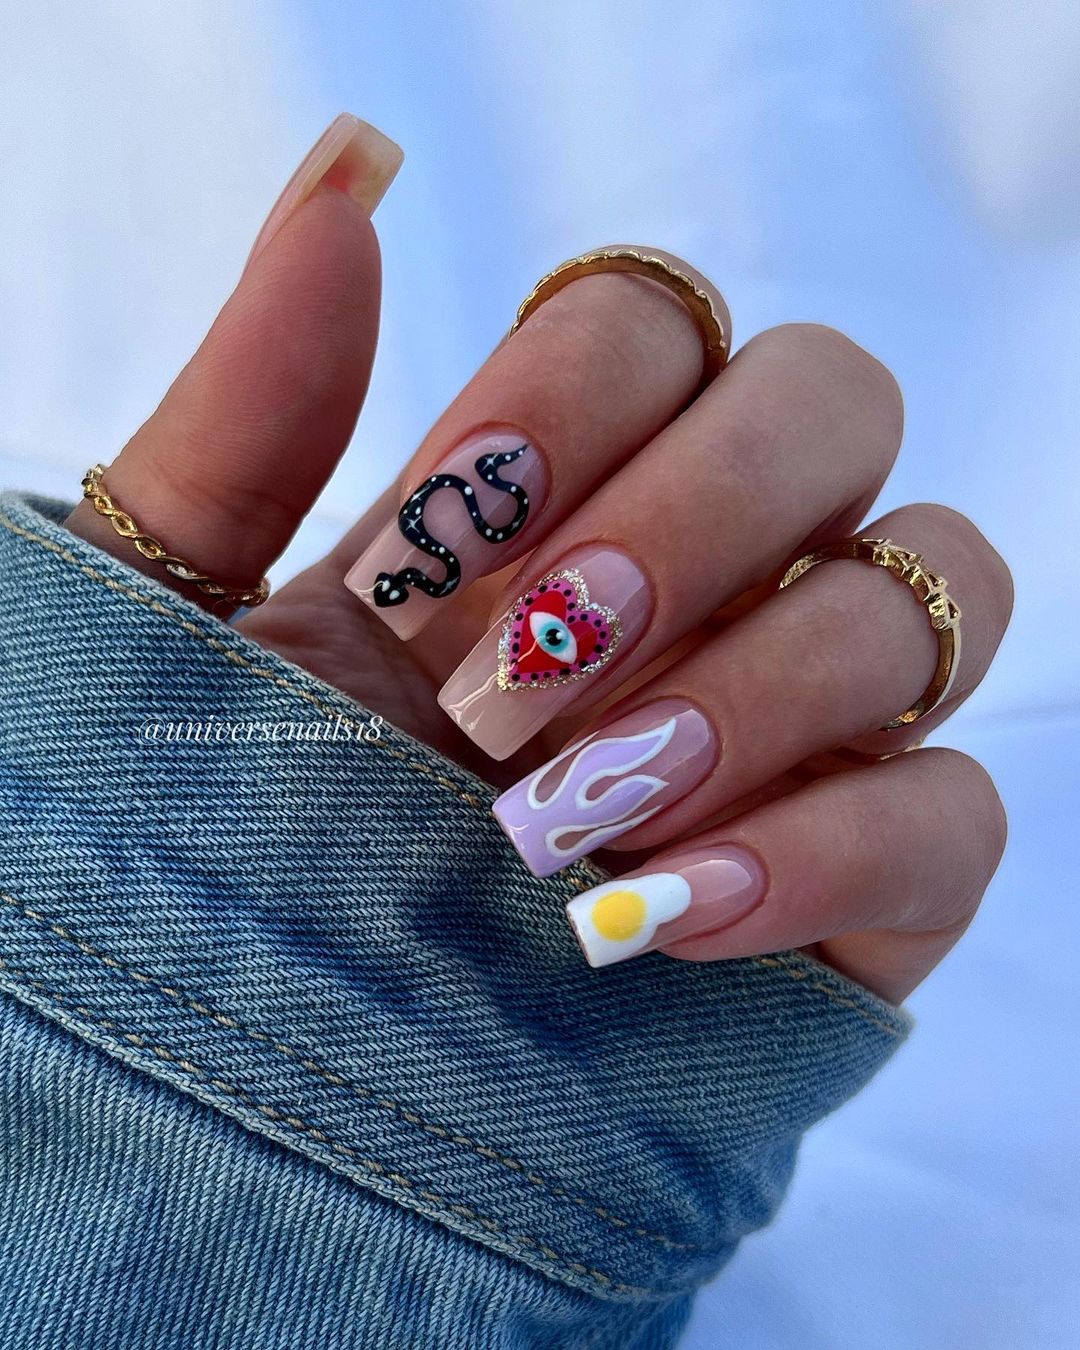
-
- Base coat: OPI Infinite Shine Primer
- Nude nail polish: Essie “Ballet Slippers”
- Black nail polish: OPI “Black Onyx”
- Red nail polish: Sally Hansen “Rapid Red”
- White nail polish: China Glaze “White on White”
- Nail art brushes: Beetles Nail Art Brushes
- Top coat: Glisten & Glow Top Coat
Creation Instructions:
-
- Apply a base coat to start.
- Paint your nails with the nude polish as the base color.
- Use nail art brushes to draw a black serpent, heart with an eye, and celestial motifs.
- Add white and red accents for extra detail.
- Finish with a top coat to seal the design and add shine.
Save Pin
Retro Rainbow Vibes
Channel the groovy vibes of the ’70s with this retro-inspired nail design. Featuring a gradient of vibrant colors and white outlines of peace signs, hearts, and stars, this look is both playful and nostalgic. The square shape enhances the vintage feel of the design.
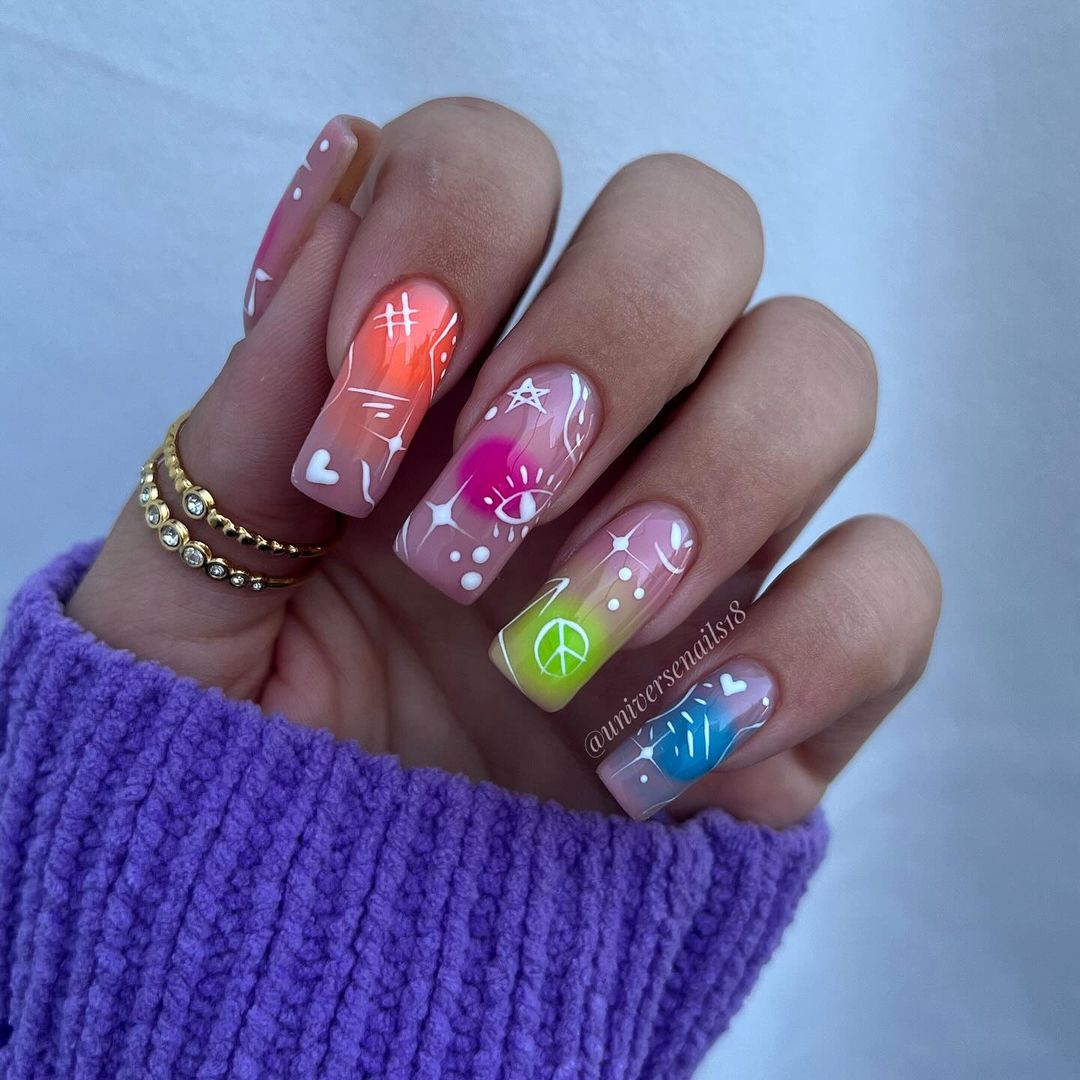
-
- Base coat: CND Stickey Base Coat
- Gradient polishes: OPI “Do You Lilac It?”, Essie “Sunday Funday”, China Glaze “Lemon Fizz”
- White nail polish: Sally Hansen “White On”
- Nail art brushes: Makartt Nail Art Brushes
- Top coat: Essie Gel Setter Top Coat
Creation Instructions:
-
- Start with a base coat to ensure your nails are protected.
- Create a gradient effect using the various polishes.
- Use nail art brushes to draw peace signs, hearts, and stars with white polish.
- Allow the designs to dry completely before applying a top coat to seal the artwork.
Golden Leaf Elegance
This design combines elegance and simplicity with a touch of autumn flair. Featuring golden leaves and glitter accents, this look is perfect for the season. The medium-length nails provide a versatile canvas for this sophisticated design.
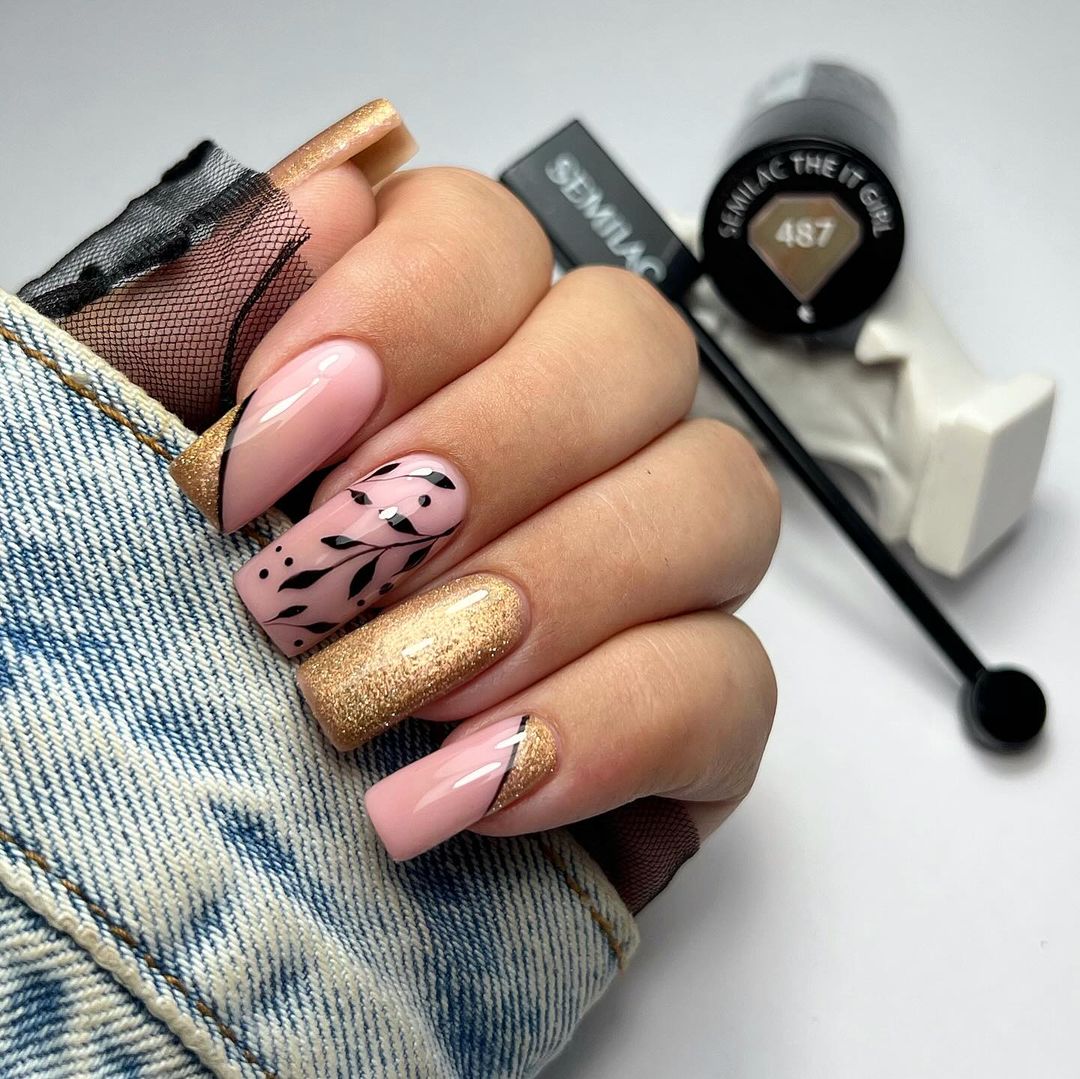
-
- Base coat: OPI Natural Nail Base Coat
- Nude nail polish: Essie “Mademoiselle”
- Gold glitter polish: China Glaze “Gold Digger”
- Black nail polish: Sally Hansen “Black Heart”
- Nail art brushes: Beetles Nail Art Brushes
- Top coat: Seche Vite Dry Fast Top Coat
Creation Instructions:
-
- Apply a base coat to protect your nails.
- Paint your nails with the nude polish as the base color.
- Use nail art brushes to draw golden leaves and add black accents.
- Apply the gold glitter polish to one or two nails for extra sparkle.
- Finish with a top coat to seal the design and add shine.
Spooky Chic
Perfect for Halloween, this design features spooky elements like snakes, eyes, and ghosts, combined with vibrant colors. The almond shape enhances the boldness of this look, making it ideal for the spooky season.
-
- Base coat: OPI Infinite Shine Primer
- Nude nail polish: Essie “Ballet Slippers”
- Green nail polish: China Glaze “Grass Is Lime Greener”
- Pink nail polish: OPI “Pink Flamenco”
- Black nail polish: OPI “Black Onyx”
- White nail polish: Sally Hansen “White On”
- Nail art brushes: Beetles Nail Art Brushes
- Top coat: Glisten & Glow Top Coat
Creation Instructions:
-
- Apply a base coat to start.
- Paint your nails with the nude polish as the base color.
- Use nail art brushes to draw snakes, eyes, ghosts, and other spooky elements.
- Add green, pink, black, and white accents for a colorful yet eerie effect.
- Finish with a top coat to seal the design and add shine.
Celestial Blue Dreams
This enchanting nail design features a celestial theme with blue gradients and mystical eye motifs. The almond shape adds elegance, while the intricate details like stars and crescent moons bring a touch of magic. The combination of blue and gold hues creates a striking contrast, perfect for fall evenings.
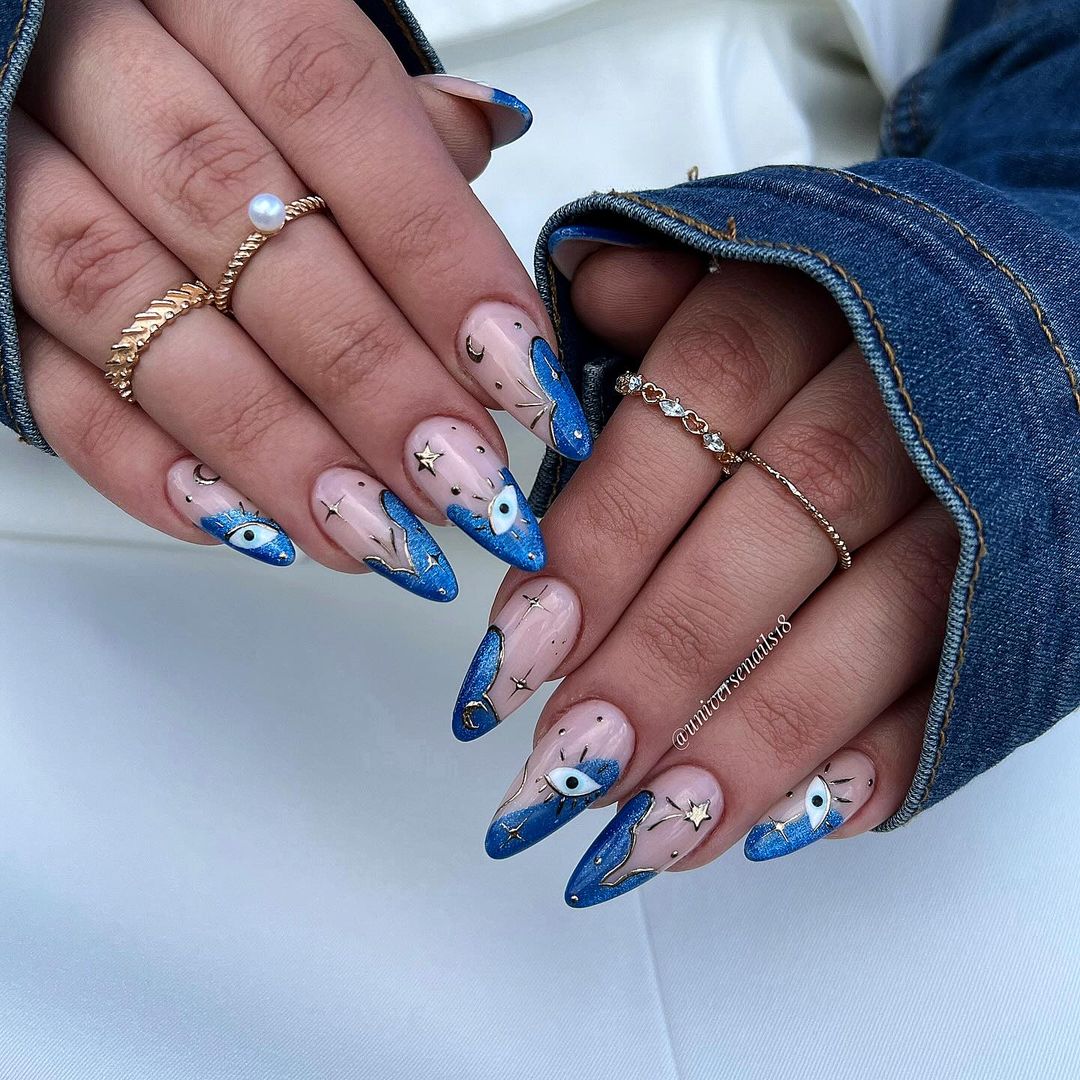
-
- Base coat: OPI Natural Nail Base Coat
- Nude nail polish: Essie “Ballet Slippers”
- Blue nail polish: OPI “Blue My Mind”
- Gold nail polish: Sally Hansen “Golden-I”
- Nail art brushes: Beetles Nail Art Brushes
- Rhinestones: Kiss Salon Secrets Luxe Accents
- Top coat: Seche Vite Dry Fast Top Coat
Creation Instructions:
-
- Apply a base coat to protect your nails.
- Paint your nails with the nude polish as the base color.
- Use nail art brushes to create blue gradients and add celestial motifs with gold polish.
- Add rhinestones for extra sparkle.
- Finish with a top coat to seal the design and add shine.
Pink Polka Dot Romance
This adorable nail design combines different shades of pink with playful polka dots and a glittery heart accent. The stiletto shape enhances the feminine charm, making it a perfect choice for a romantic autumn day.
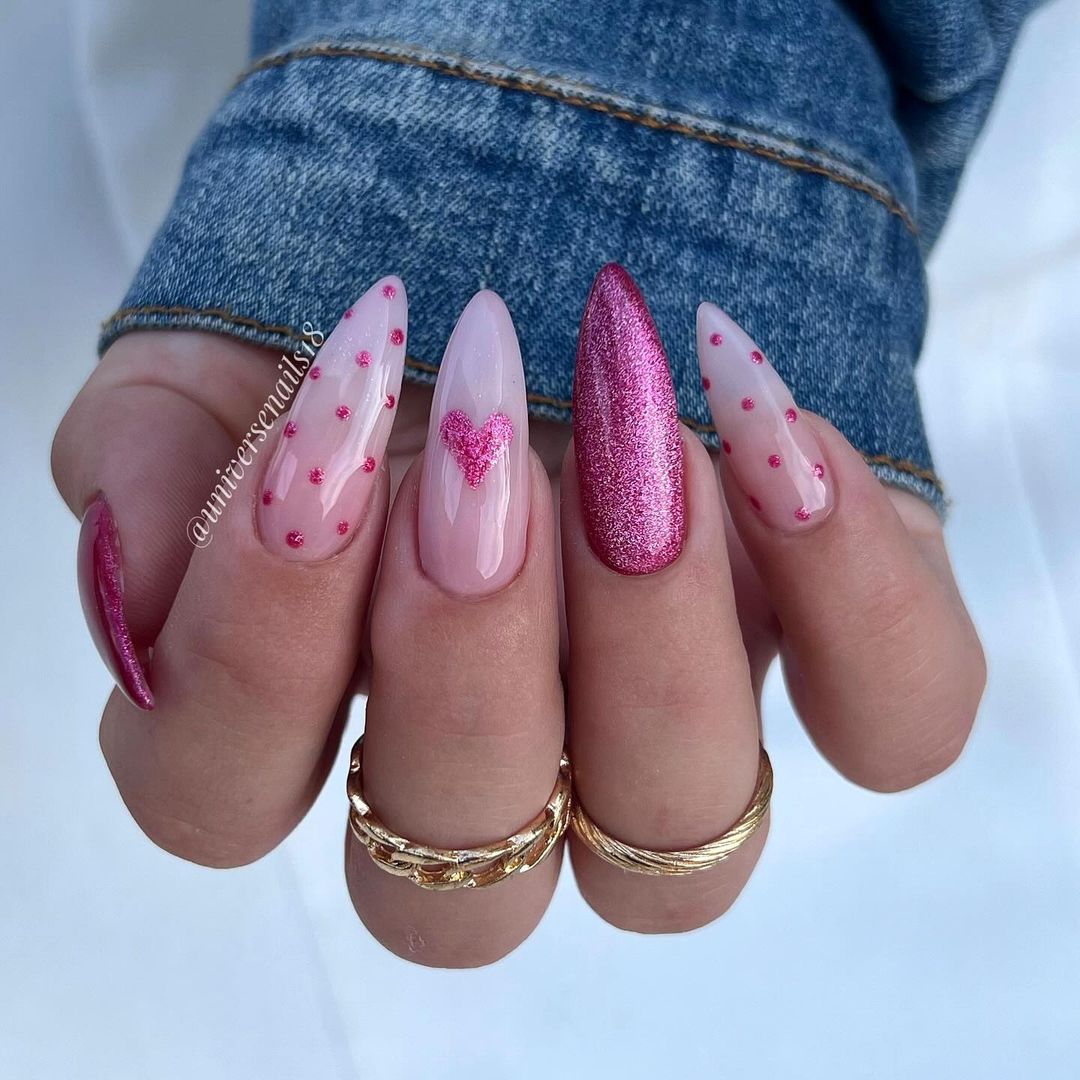
-
- Base coat: CND Stickey Base Coat
- Nude nail polish: Essie “Topless & Barefoot”
- Pink glitter polish: China Glaze “Pom Pom”
- Pink nail polish: OPI “Pink Flamenco”
- Dotting tool: Makartt Dotting Tools
- Top coat: Essie Gel Setter Top Coat
Creation Instructions:
-
- Start with a base coat to ensure your nails are protected.
- Apply the nude base color to all nails.
- Use a dotting tool to create polka dots with pink glitter polish.
- Draw a heart shape with the pink glitter polish on one of the nails.
- Finish with a top coat for a glossy finish.
Luxe Black and Gold Hearts
This sophisticated nail design features black and gold accents with heart motifs. The square shape adds a modern touch, while the gold foil details elevate the overall look, making it perfect for a luxurious autumn style.
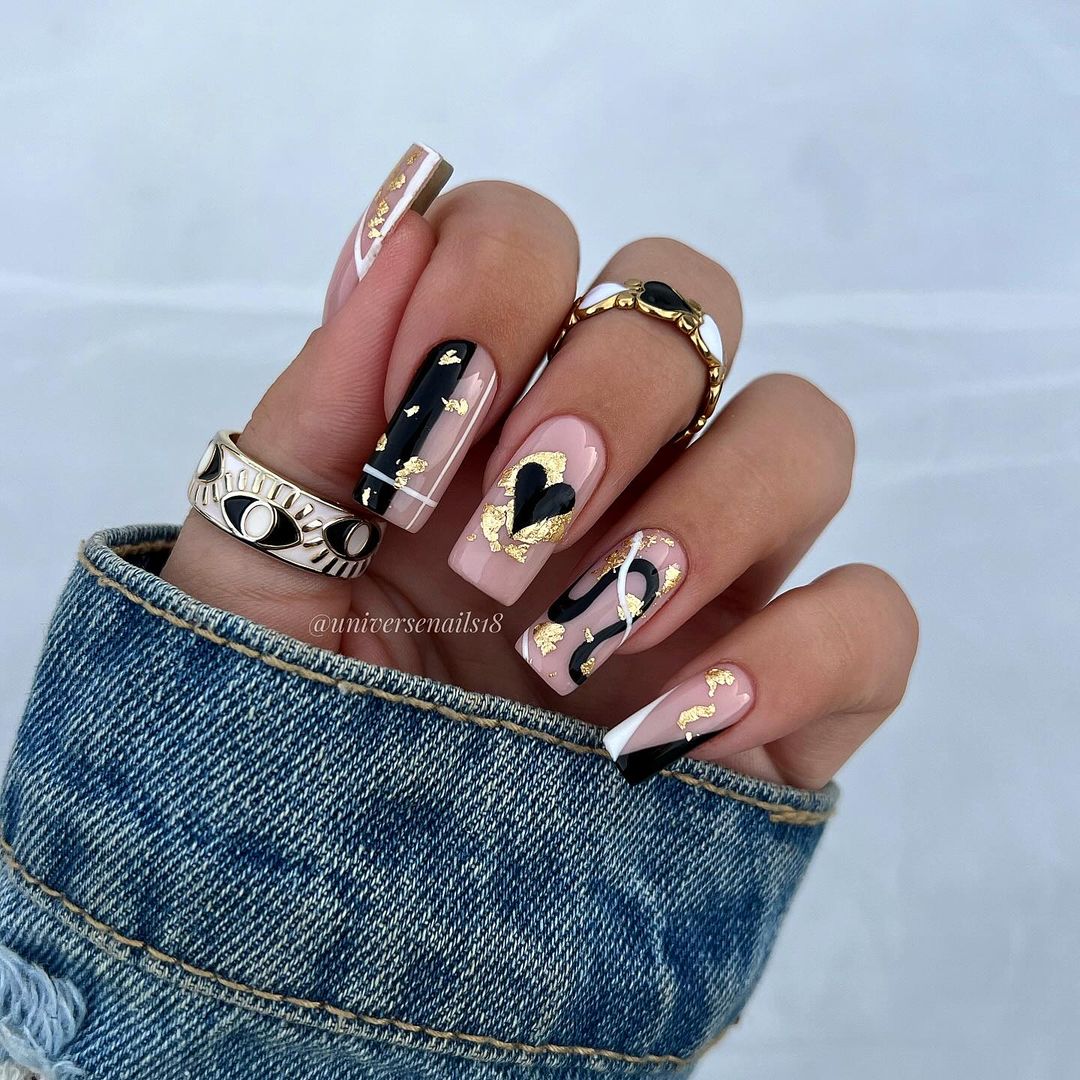
-
- Base coat: OPI Infinite Shine Primer
- Nude nail polish: Essie “Ballet Slippers”
- Black nail polish: OPI “Black Onyx”
- Gold foil: Nail Foil by Kiss
- Nail art brushes: Beetles Nail Art Brushes
- Top coat: Glisten & Glow Top Coat
Creation Instructions:
-
- Apply a base coat to start.
- Paint your nails with the nude polish as the base color.
- Use nail art brushes to create heart motifs with black polish.
- Add gold foil accents for a touch of luxury.
- Finish with a top coat to seal the design and add shine.
Minimalist Black Doodles
This design is perfect for those who love minimalist art. Featuring simple black doodles on a nude base, this design is chic and trendy. The short, square shape makes it ideal for everyday wear while still standing out with its unique style.
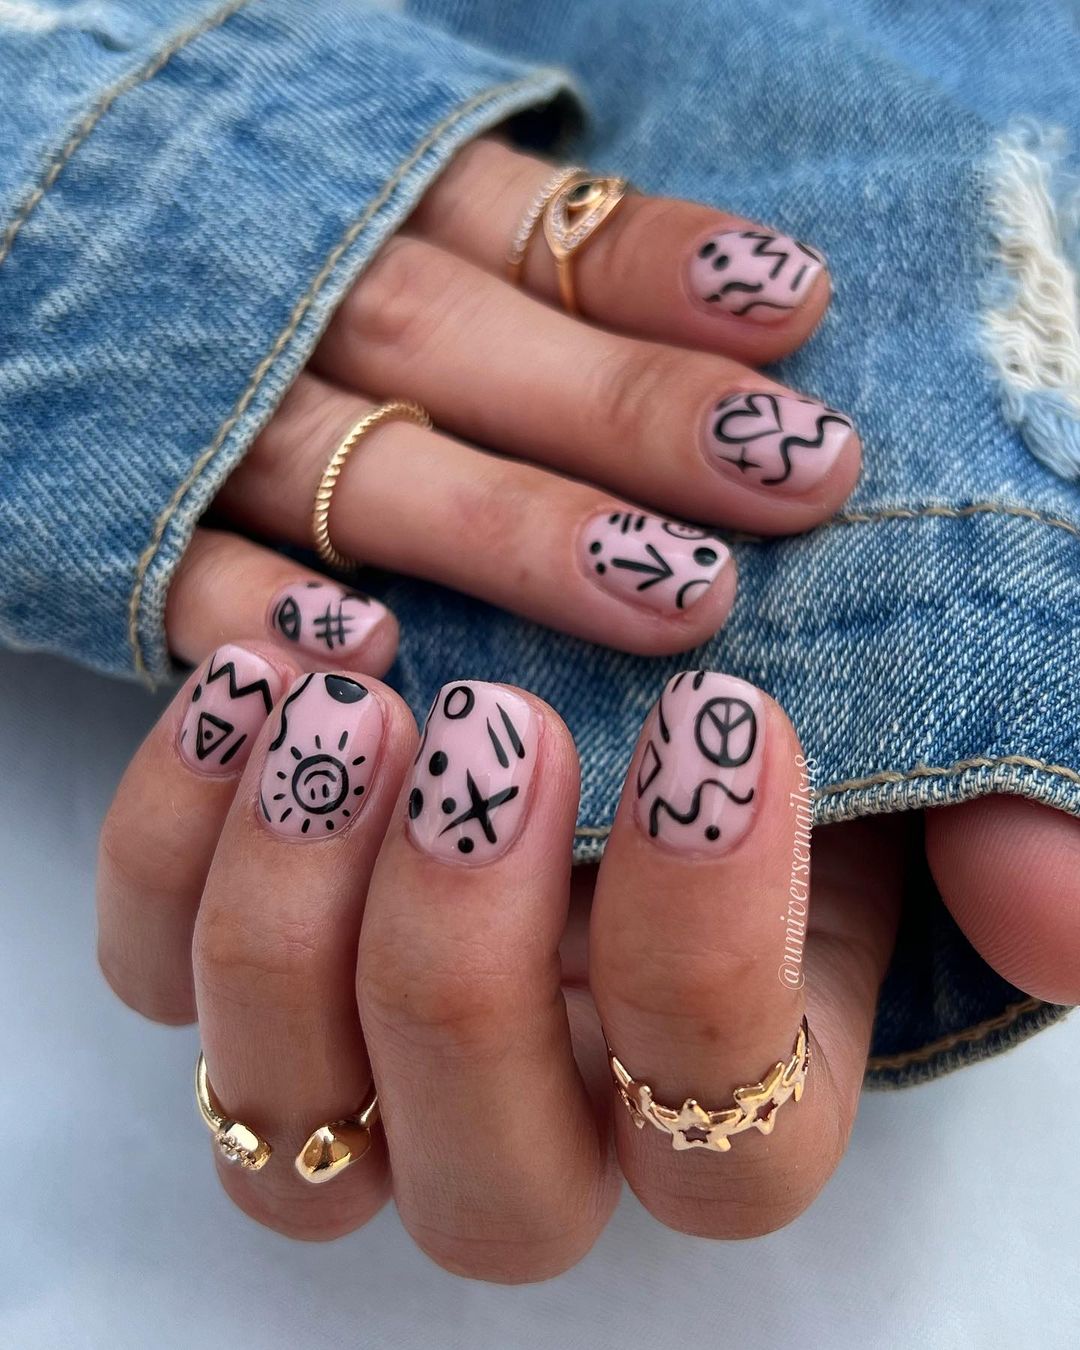
-
- Base coat: OPI Natural Nail Base Coat
- Nude nail polish: Essie “Mademoiselle”
- Black nail polish: Sally Hansen “Black Heart”
- Nail art pens: Sally Hansen Nail Art Pen
- Top coat: Seche Vite Dry Fast Top Coat
Creation Instructions:
-
- Apply a base coat to protect your nails.
- Paint your nails with the nude polish as the base color.
- Use nail art pens to draw simple black doodles on each nail.
- Finish with a top coat to seal the design and add shine.
Chic Cow Print
This stylish design features a chic cow print pattern with gold accents. The medium-length square nails provide a perfect canvas for this trendy design. The combination of black and white with gold foil creates a modern, high-fashion look.
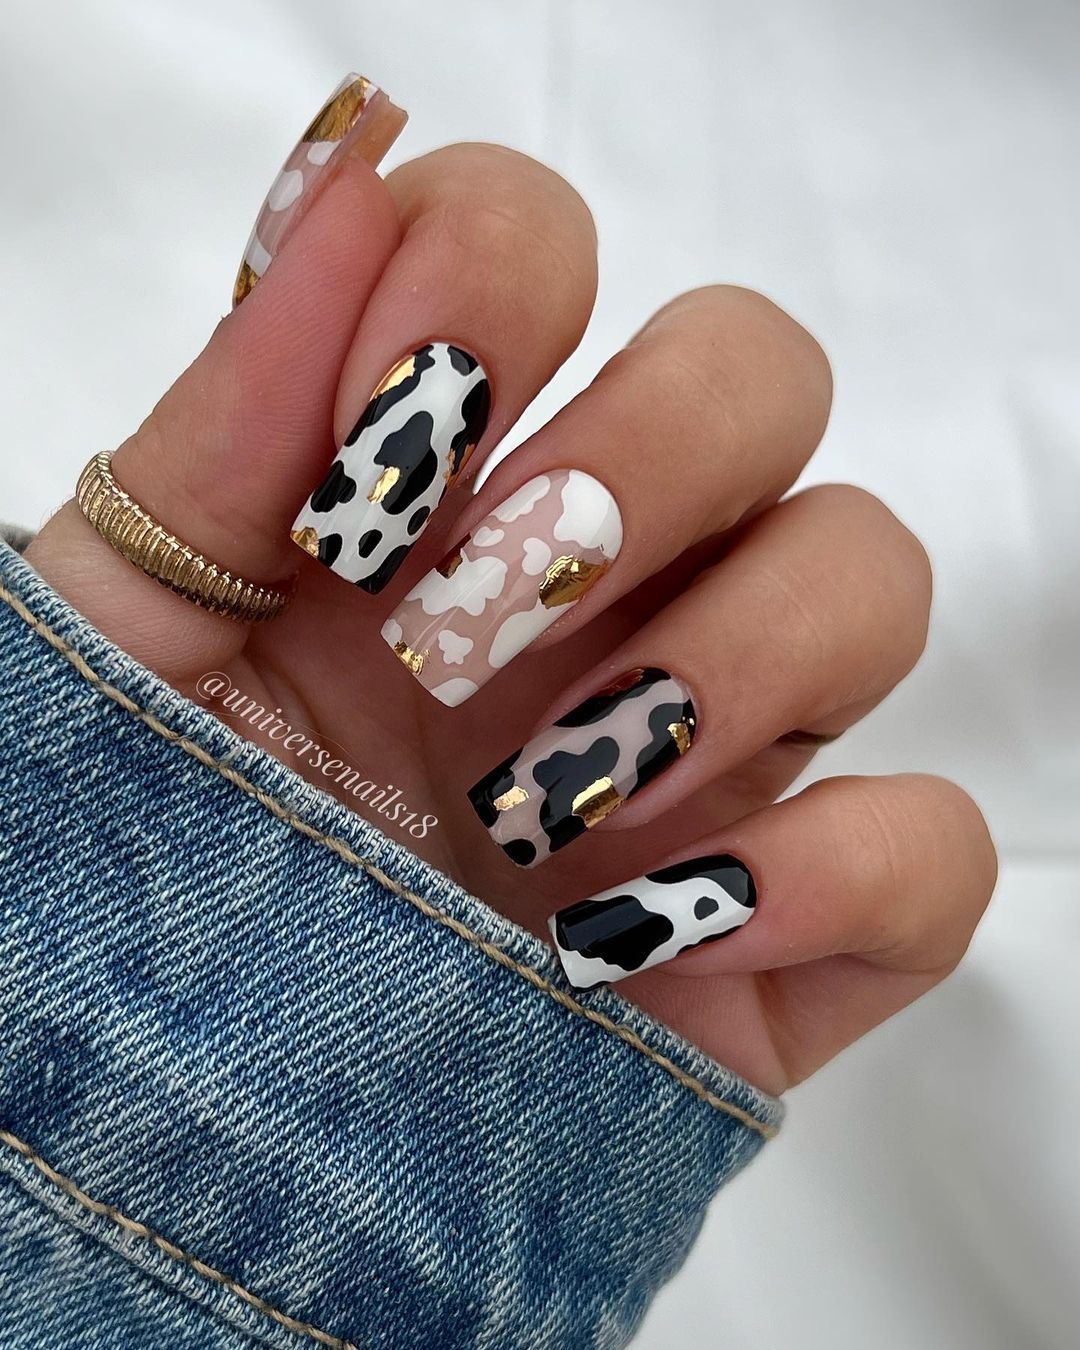
-
- Base coat: CND Stickey Base Coat
- White nail polish: OPI “Alpine Snow”
- Black nail polish: OPI “Black Onyx”
- Gold foil: Nail Foil by Kiss
- Nail art brushes: Makartt Nail Art Brushes
- Top coat: Essie Gel Setter Top Coat
Creation Instructions:
-
- Start with a base coat to ensure your nails are protected.
- Paint your nails with the white polish as the base color.
- Use nail art brushes to create cow print patterns with black polish.
- Add gold foil accents for a touch of elegance.
- Finish with a top coat for a glossy finish.
Delicate Daisy Delight
This delicate nail design features tiny daisy flowers on a nude base, creating a subtle and elegant look. The short square shape is practical and chic, making it perfect for those who prefer a minimalist yet stylish manicure.
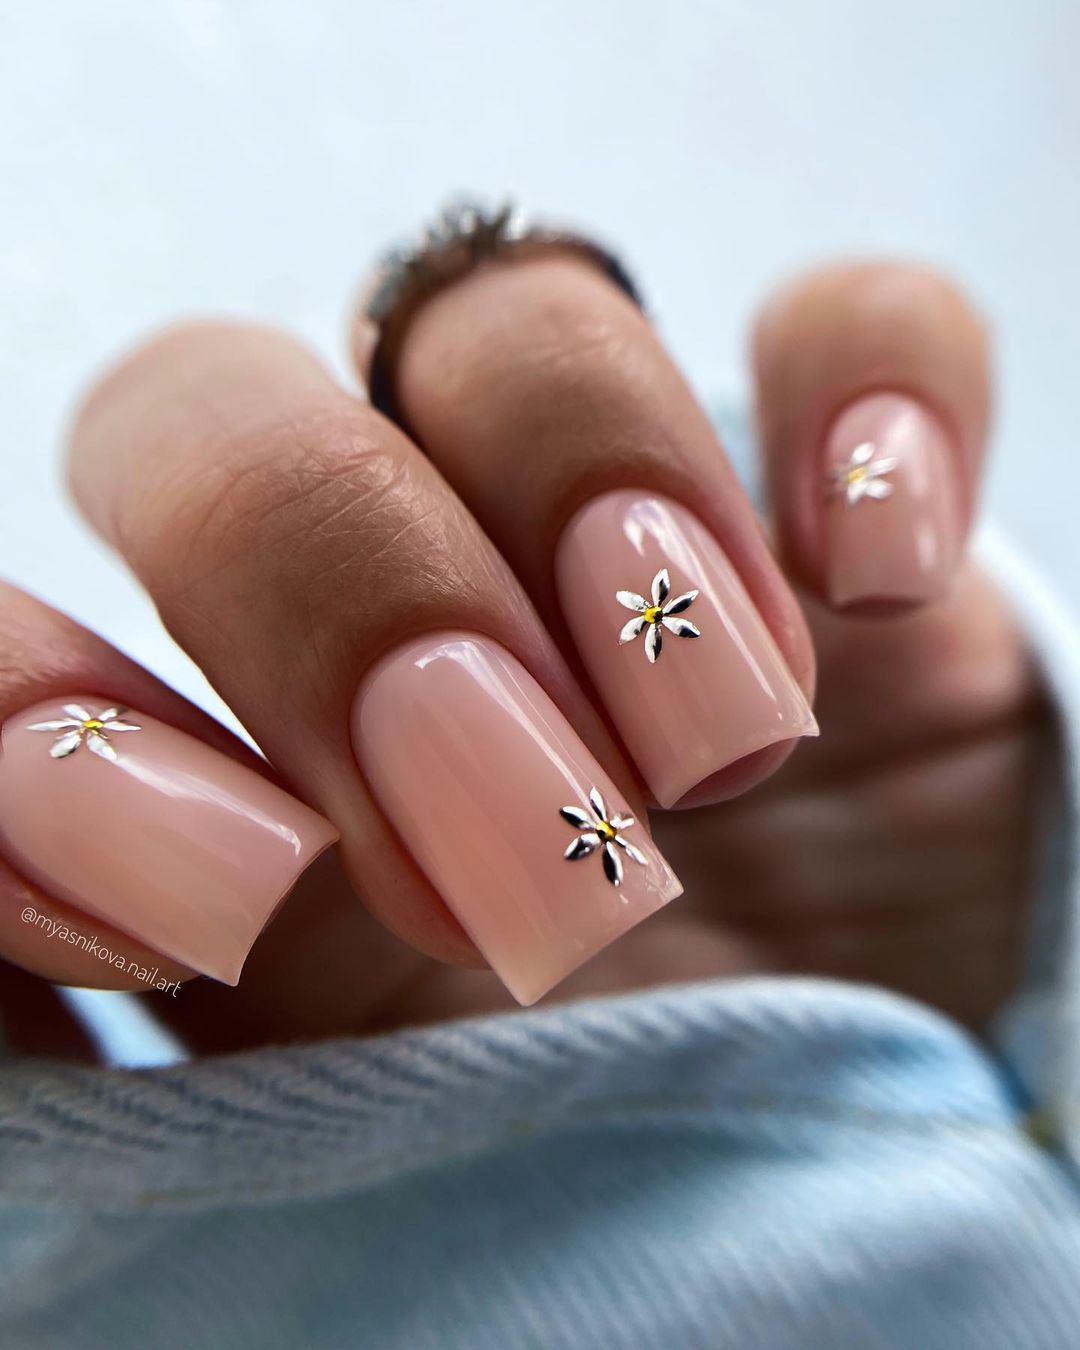
-
- Base coat: OPI Natural Nail Base Coat
- Nude nail polish: Essie “Ballet Slippers”
- White nail polish: Sally Hansen “White On”
- Yellow nail polish: OPI “Sun, Sea, and Sand in My Pants”
- Nail art brushes: Beetles Nail Art Brushes
- Top coat: Seche Vite Dry Fast Top Coat
Creation Instructions:
-
- Apply a base coat to protect your nails.
- Paint your nails with the nude polish as the base color.
- Use nail art brushes to draw tiny daisy flowers with white and yellow polishes.
- Finish with a top coat to seal the design and add shine.
Blush and Gold Elegance
This elegant nail design features a delicate blush pink base with a stunning gold tulip accent. The gradient effect adds a subtle depth to the design, while the gold detailing brings a touch of luxury, making it perfect for any sophisticated occasion.
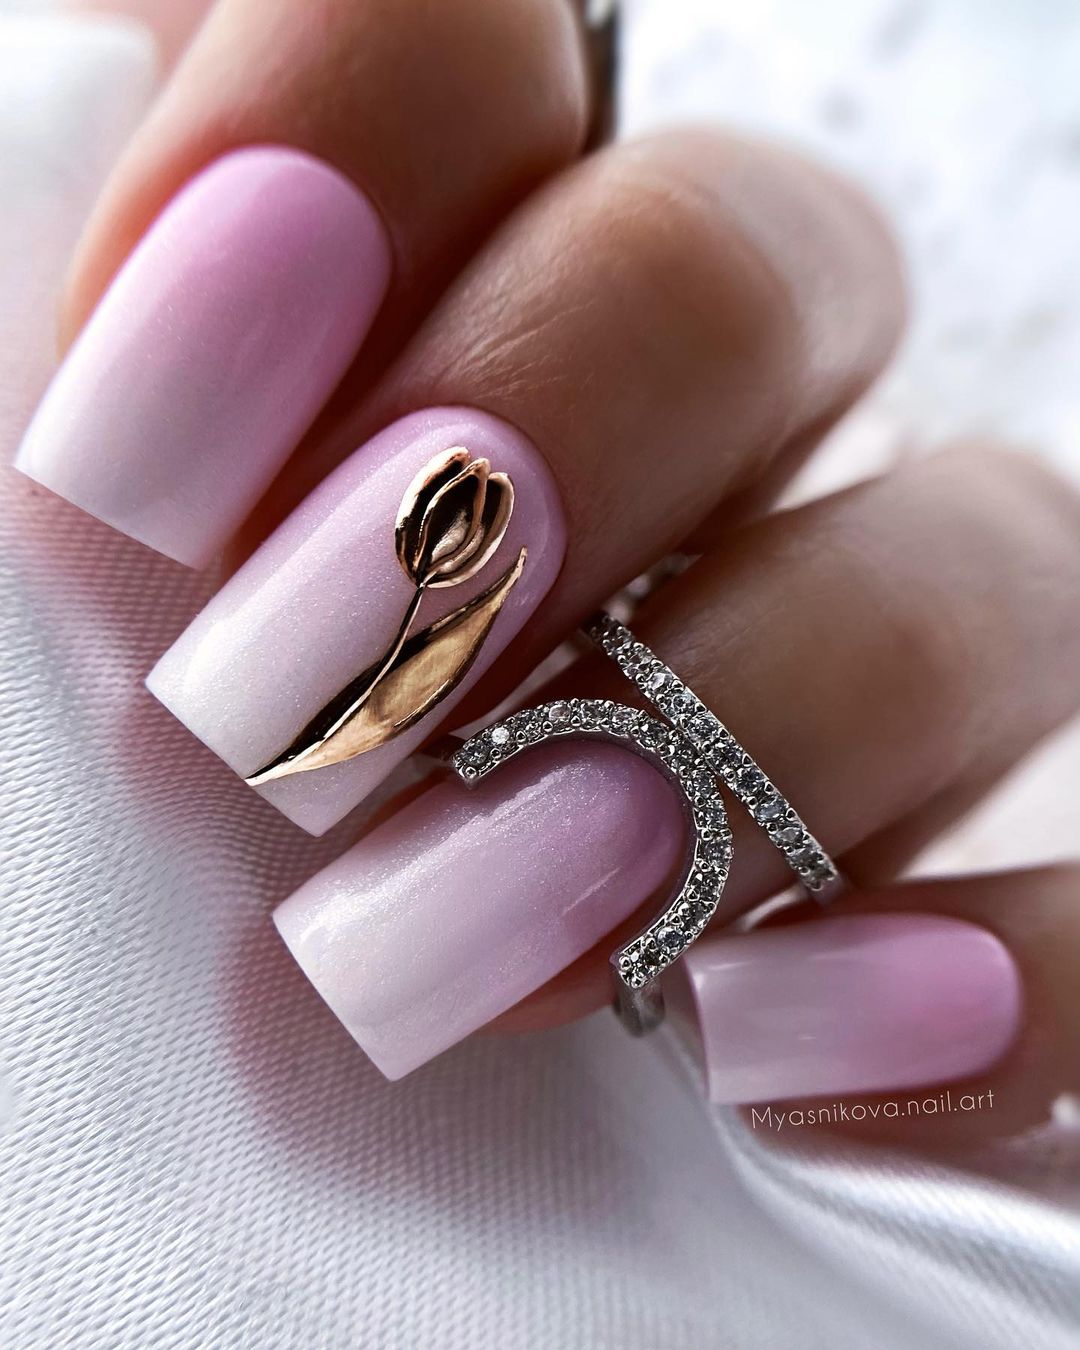
-
- Base coat: OPI Nail Envy
- Blush pink nail polish: Essie “Fiji”
- Gold nail polish: Sally Hansen “Golden-I”
- Gradient sponge: Real Techniques Miracle Complexion Sponge
- Top coat: Seche Vite Dry Fast Top Coat
Creation Instructions:
-
- Apply a base coat to protect your nails.
- Create a gradient effect using the blush pink polish with a sponge.
- Use nail art brushes to draw the gold tulip accent.
- Finish with a top coat to seal the design and add shine.
Rainy Day Blues
Embrace the whimsical side of nail art with this rainy day design. Featuring a matte white base with blue and silver accents depicting clouds and raindrops, this look is both playful and stylish. Perfect for a cozy autumn day.
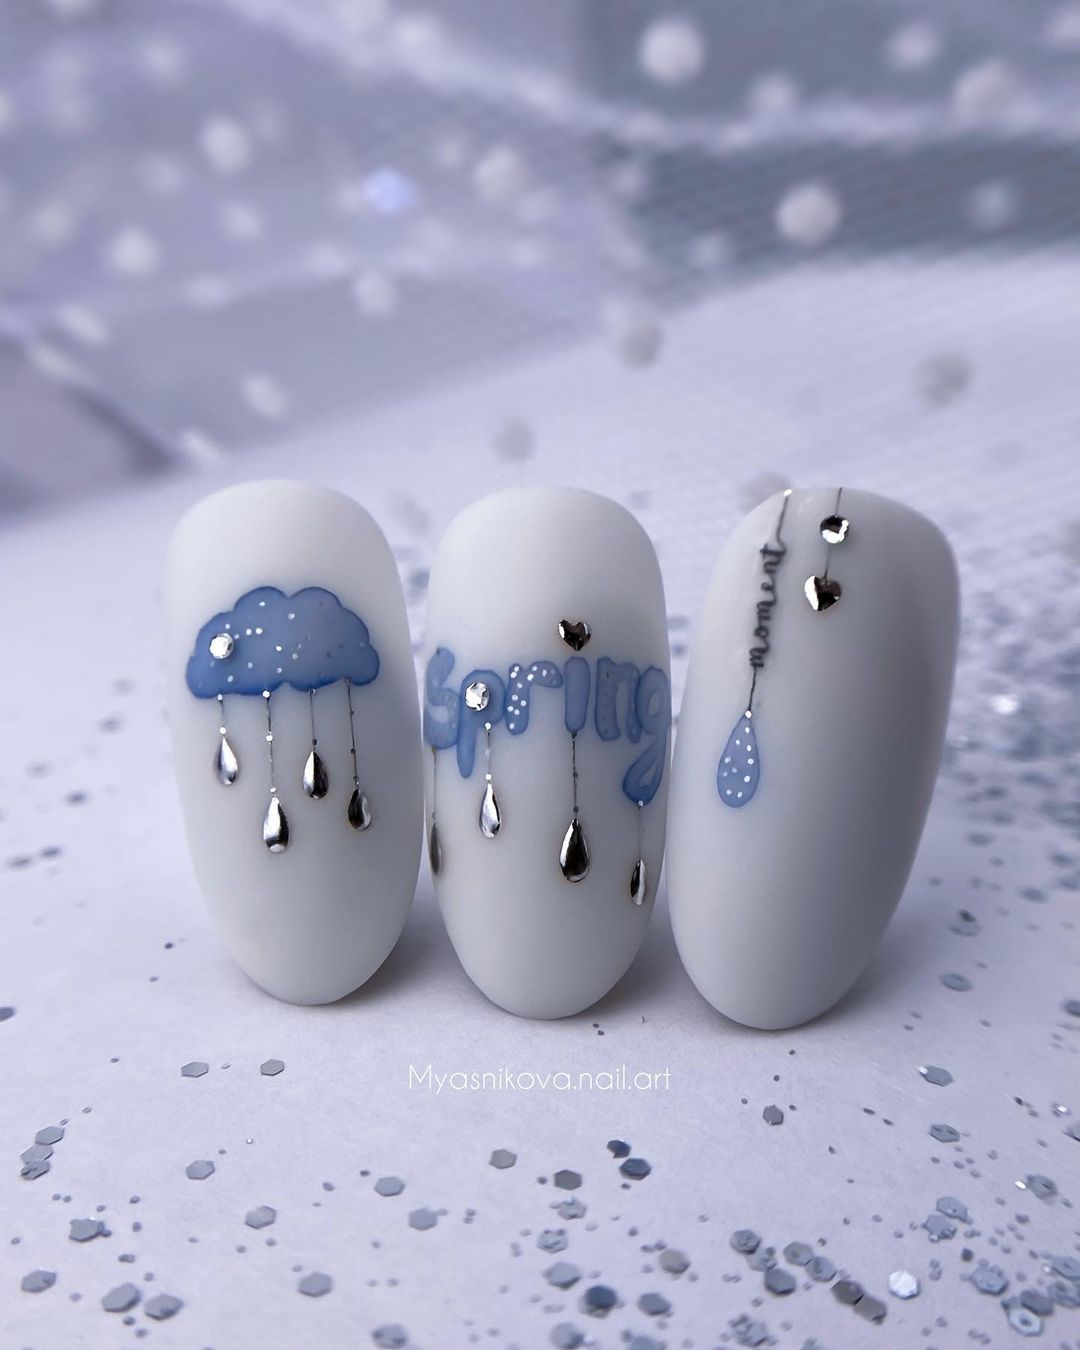
-
- Base coat: CND Stickey Base Coat
- Matte white nail polish: OPI “Alpine Snow” Matte
- Blue nail polish: Essie “Bikini So Teeny”
- Silver nail polish: Sally Hansen “Silver Sweep”
- Nail art brushes: Makartt Nail Art Brushes
- Top coat: Essie Gel Setter Top Coat
Creation Instructions:
-
- Start with a base coat to ensure your nails are protected.
- Apply the matte white base color to all nails.
- Use nail art brushes to create clouds and raindrops with blue and silver polishes.
- Finish with a top coat for a lasting matte effect.
Silver Drizzle
This sleek design features a white base with silver raindrop accents, creating a chic and minimalist look. The short square nails make this design perfect for everyday wear while still standing out with its unique style.

-
- Base coat: OPI Natural Nail Base Coat
- White nail polish: Essie “Blanc”
- Silver nail polish: China Glaze “Platinum Silver”
- Nail art pens: Sally Hansen Nail Art Pen
- Top coat: Seche Vite Dry Fast Top Coat
Creation Instructions:
-
- Apply a base coat to protect your nails.
- Paint your nails with the white polish as the base color.
- Use nail art pens to draw silver raindrop designs.
- Finish with a top coat to seal the design and add shine.
Autumn Acorn Charm
Capture the essence of fall with this charming acorn nail design. The neutral taupe base paired with metallic and rhinestone accents creates a sophisticated yet festive look, ideal for celebrating the season.
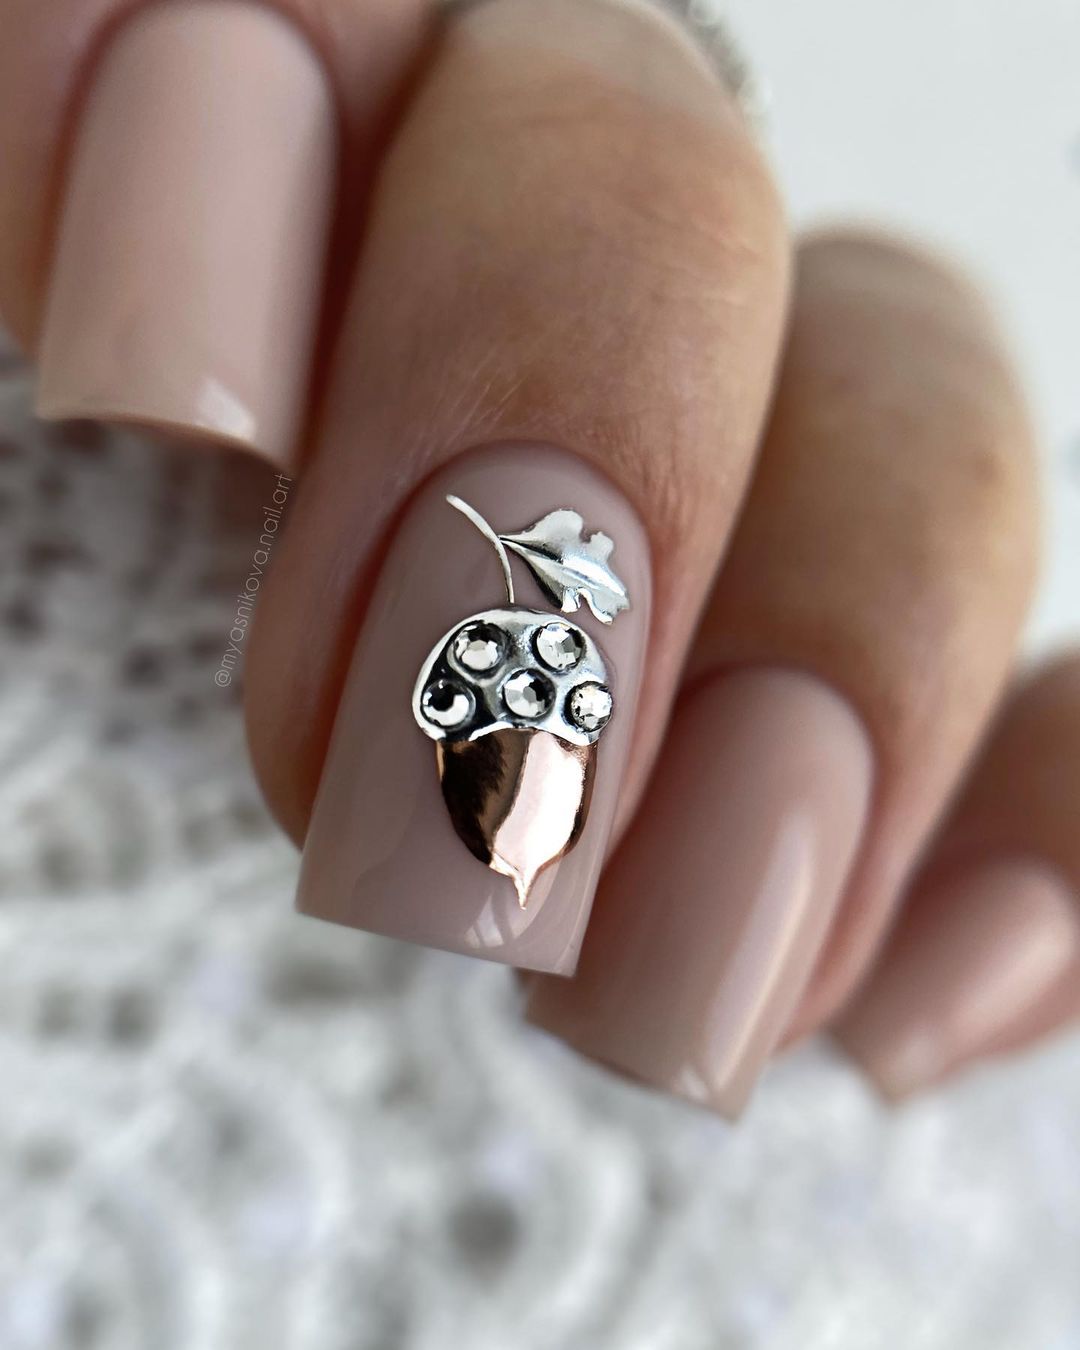
-
- Base coat: OPI Infinite Shine Primer
- Taupe nail polish: Essie “Chinchilly”
- Metallic gold polish: Sally Hansen “Golden-I”
- Rhinestones: Kiss Salon Secrets Luxe Accents
- Nail art brushes: Beetles Nail Art Brushes
- Top coat: Glisten & Glow Top Coat
Creation Instructions:
-
- Apply a base coat to start.
- Paint your nails with the taupe polish as the base color.
- Use nail art brushes to draw the metallic acorn and add rhinestones for extra detail.
- Finish with a top coat to seal the design and add shine.
Elegant Pears
This elegant design features a creamy white base with golden pear accents. The combination of white and gold creates a sophisticated look that’s perfect for any occasion. The short square nails enhance the chic and clean appearance of the design.
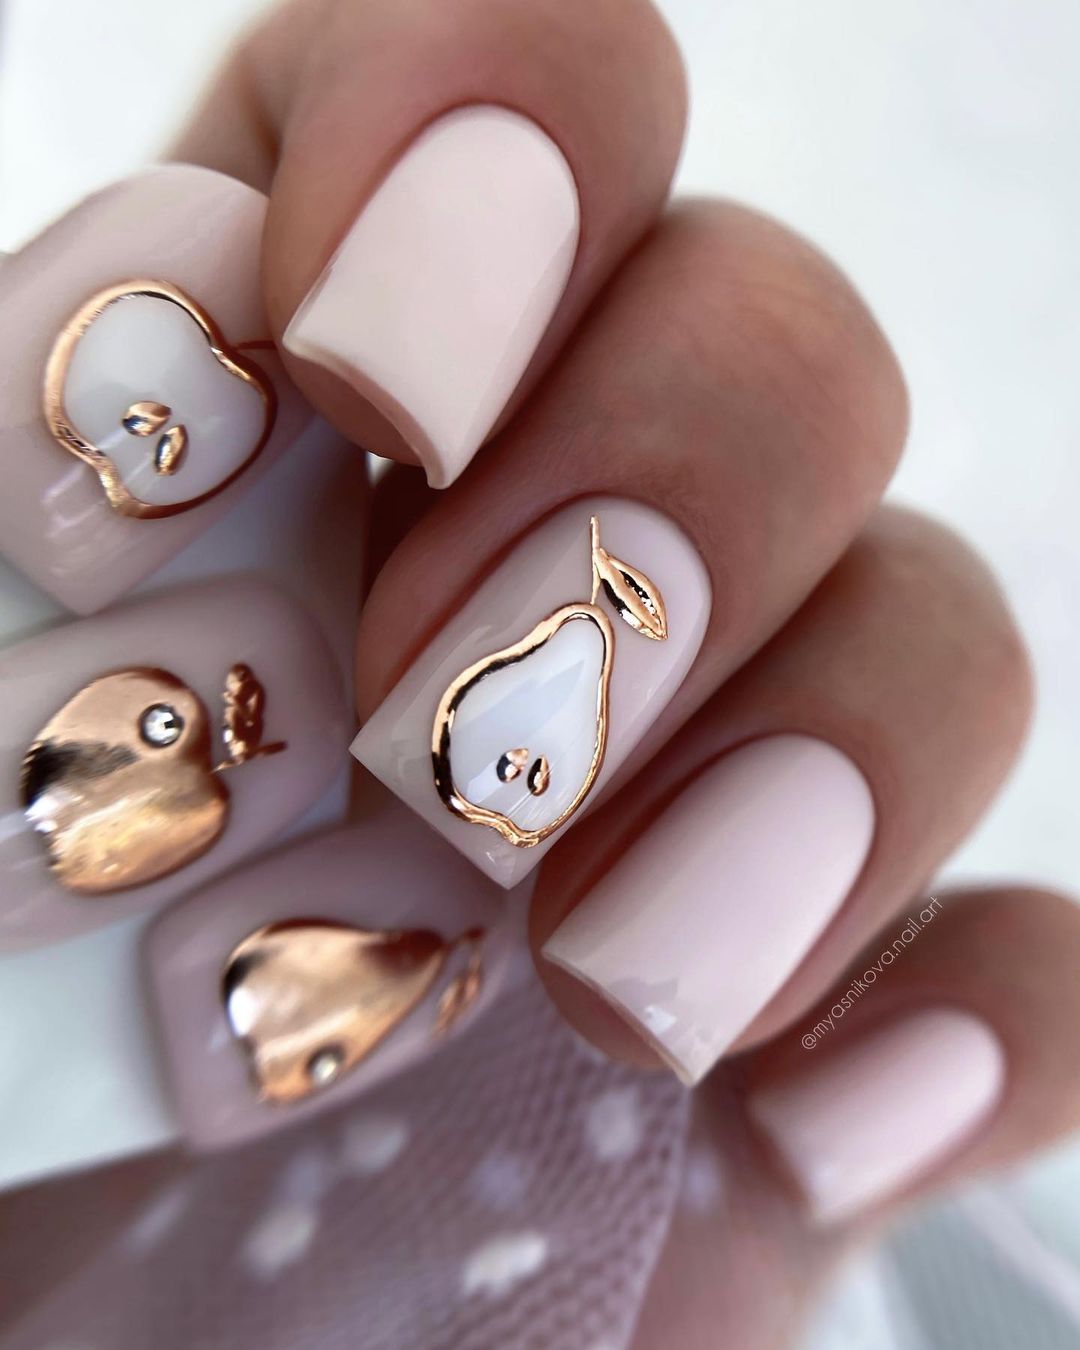
-
- Base coat: OPI Nail Envy
- Creamy white nail polish: Essie “Marshmallow”
- Gold nail polish: China Glaze “Mingle with Kringle”
- Nail art brushes: Makartt Nail Art Brushes
- Top coat: Seche Vite Dry Fast Top Coat
Creation Instructions:
-
- Apply a base coat to protect your nails.
- Paint your nails with the creamy white polish as the base color.
- Use nail art brushes to draw the golden pear accents.
- Finish with a top coat to seal the design and add shine.
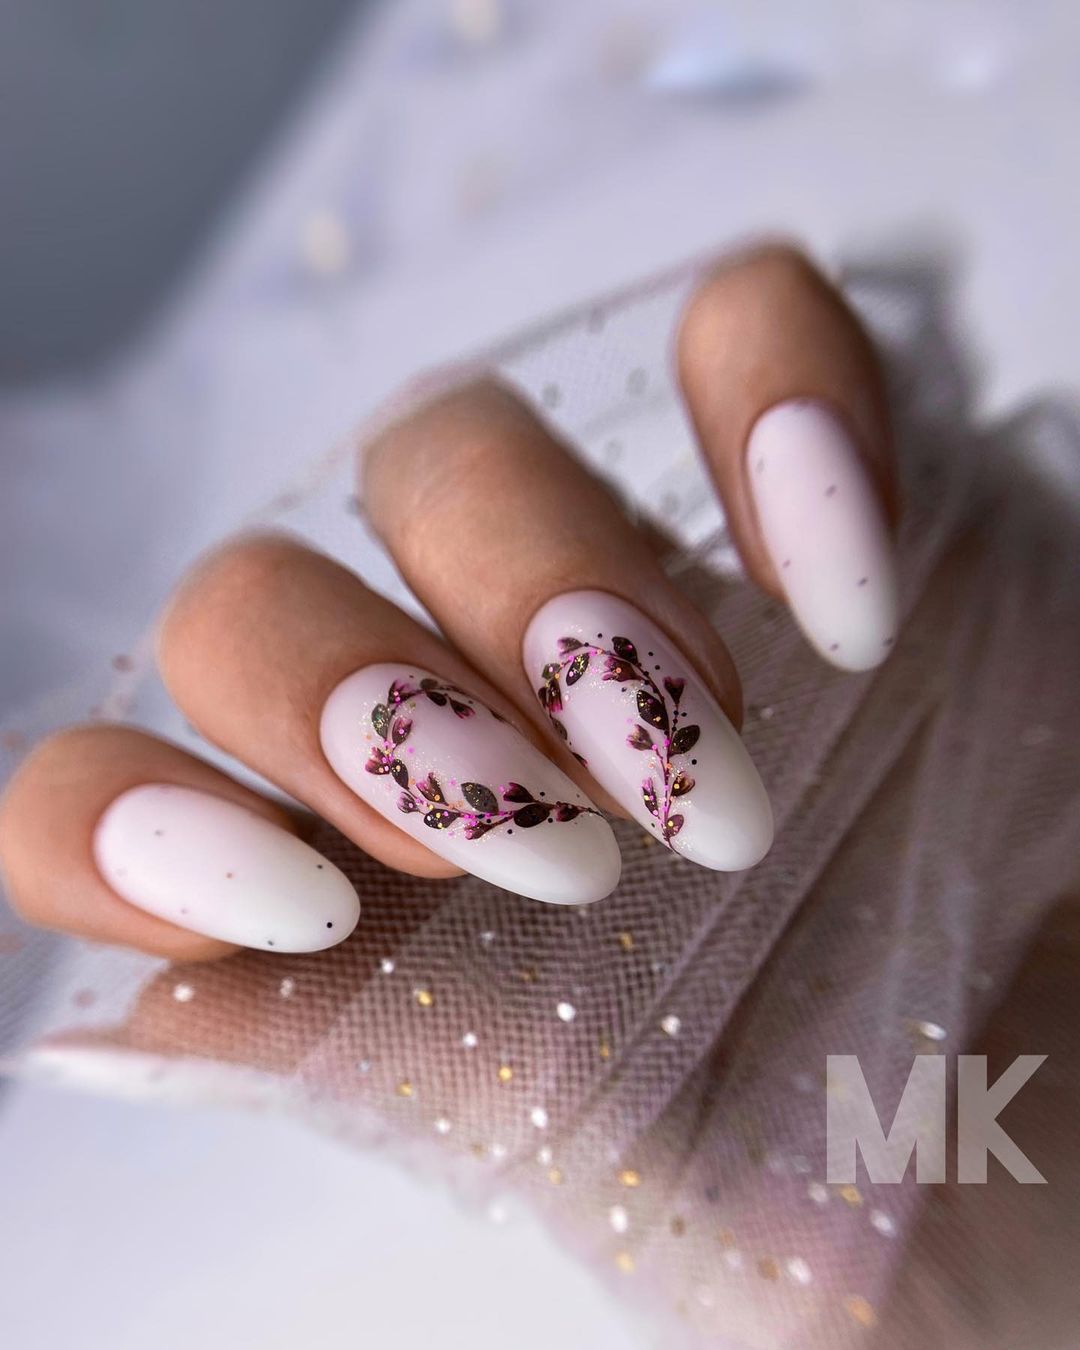
Floral Vine Delight
This design features a delicate floral vine pattern on a soft pink base, creating a romantic and elegant look. The almond shape of the nails enhances the graceful appearance, making it perfect for special occasions or everyday elegance.
-
- Base coat: CND Stickey Base Coat
- Soft pink nail polish: OPI “Mod About You”
- Green nail polish: Essie “Mojito Madness”
- Pink glitter polish: China Glaze “Fairy Dust”
- Nail art brushes: Beetles Nail Art Brushes
- Top coat: Essie Gel Setter Top Coat
Creation Instructions:
-
- Start with a base coat to ensure your nails are protected.
- Paint your nails with the soft pink polish as the base color.
- Use nail art brushes to draw the floral vine pattern with green and pink glitter polishes.
- Finish with a top coat for a glossy finish.
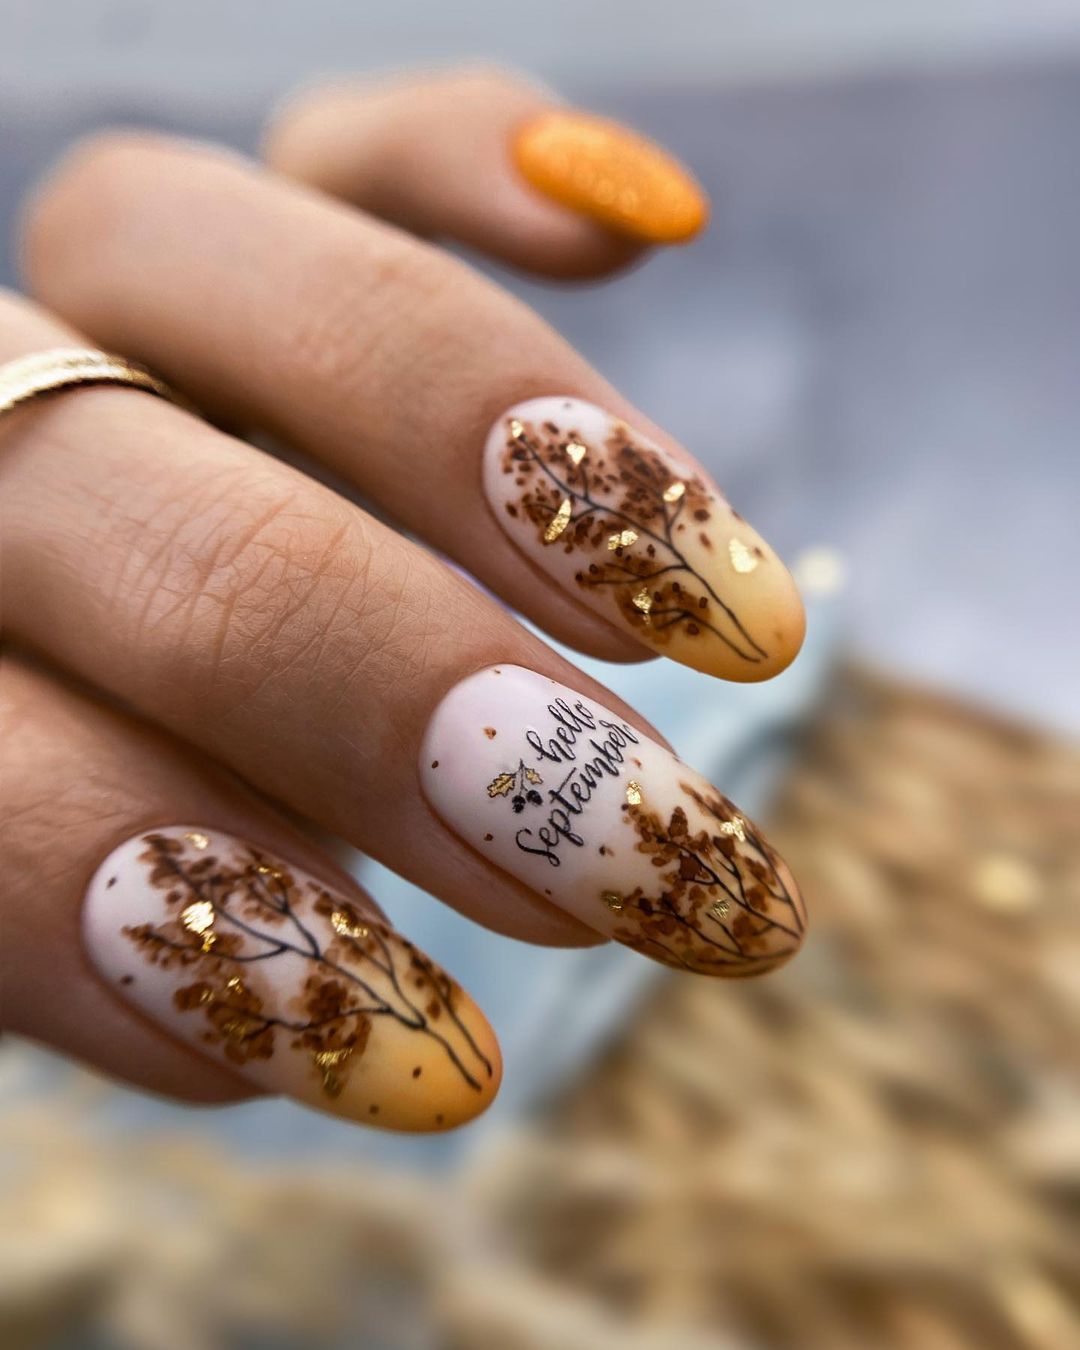
Golden Autumn Leaves
Celebrate the arrival of autumn with this stunning leaf design. Featuring golden leaves on a gradient orange and white base, this design captures the beauty of fall foliage. The oval shape of the nails adds elegance and sophistication.
-
- Base coat: OPI Infinite Shine Primer
- Orange nail polish: Essie “Playing Koi”
- White nail polish: OPI “Alpine Snow”
- Gold leaf foil: Nail Foil by Kiss
- Nail art brushes: Makartt Nail Art Brushes
- Top coat: Glisten & Glow Top Coat
Creation Instructions:
-
- Apply a base coat to start.
- Create a gradient effect with orange and white polishes.
- Use nail art brushes to add golden leaf accents.
- Finish with a top coat to seal the design and add shine.
FAQ
Q: How do I make my fall gel nail designs last longer? A: To extend the life of your gel manicure, always apply a base coat, use high-quality polishes, and finish with a durable top coat. Avoid using your nails as tools and wear gloves when doing household chores.
Q: Can I create these designs on natural nails, or do I need acrylics? A: These designs can be created on both natural and acrylic nails. Just ensure your natural nails are healthy and properly prepped.
Q: What should I do if my gel nails start to chip? A: If you notice chipping, you can touch up the design with the same polish and finish with a top coat. For severe chipping, it’s best to remove the gel and start fresh to avoid damage to your nails.
Q: How often should I change my gel nail design? A: It’s generally recommended to change your gel manicure every 2-3 weeks to maintain nail health and keep your look fresh.
Q: Are these designs suitable for short nails? A: Absolutely! These designs can be adapted to short, medium, and long nails. Just adjust the scale of the artwork to fit your nail length.
By following these tips and tricks, you’ll be able to create stunning fall gel nail designs that are perfect for the season. Whether you prefer something cute, trendy, or simple, there’s a design here that will suit your style. Happy manicuring!